About Me

My photo
I have been a Stampin' Up Demonstrator for almost two years now, and when I signed up it was just for the starter kit and discount on products........ I never imagined it would snowball into being a business like it has. I am a new Mummy to my little boy, Isaac, who is almost four months old now. I am spending my maternity leave enjoying watch him grow up, becoming his own little person, and also trying to build my business up. Stampin' Up! have amazing products and I would love to share my crafting passion with as many people as possible. I am always putting through orders, so if you need anything, or just want some information or advise, please do not hesitate to contact me. If you want to try before you buy, then check out my classes and get booked on.
Showing posts with label Scallop Border Punch. Show all posts

Sunday, 24 February 2013

First Card Class of 2013

Hello,

It's been a while since I have blogged, but with a now 10 week old little man it's been hard to find the time.........  I have however managed to work in some Stampin' Up time and prepped for my first class of 2013 which held was yesterday.

I was joined by 11 lovely ladies who all coo'd over Isaac before getting to work on the five cards I had prepared for them, all based around products in the new Spring/Summer Seasonal Catalogue!

With time being so limited I was very thankful for the wonder that is Pinterest!  I did CASE quite a few designs and elements from cards I saw on Pinterest, which did save me a huge amount of time trying to design from scratch.

Here is the first card:


I used the gorgeous Swallowtail stamp, which is full of detail that is captured brilliantly using embossing powders.  Stampin' Up have super fine embossing powders which come in so many lush colours!  On this card I used Melon Mambo (from the Main Catalogue) and Pool Party (a new colour in the Spring/Summer Seasonal Catalogue)  They look fab together don't you think?

I added a banner across the bottom of the card which was punched with the Scallop Border Punch and a length of Pool Party Seam Binding Ribbon was added.  


The sentiment in Melon Mambo ink is from Fabulous Phrases, stamped onto one of the designs from the Lots of Tags Sizzlit set.  This was attached using an Antique Brad (one of my favourite accessories)

Quite a few of the ladies commented on how they never get their embossing powders out, or said they only had boring colours!  I really hope that they now use their embossing powders more often and they can create striking cards and are actually really quick and easy to use!

If you want advice on using embossing powders, or maybe want a demonstration, then contact me to arrange a private card class, or a home workshop........  they are really fun :o)

I have lots of other lovely cards to share with you, so watch this space!


Julie Halls
Independent Stampin' Up! Demonstrator
07786266722 / 01256 335270


Wednesday, 7 November 2012

October Card Class - New Products Card 2

Hi there,

This is the second card from my October New Products class, and it was inspired by a few cards I saw on Pinterest.  Such an amazing site for inspiration, though it can eat away at the hours!!!!

I love the bright colour combinations of the Floral District Designer Paper, and it makes putting together a card so simply when you use the DSP as the colour combo is all picked out for you :o)

The base is Rose Red, a very underused colour by me, but I loved it on this card.
There is a layer of Whisper White, topped with a strip of the DSP and edged with strips of Rose Red on which we used the Scallop Border Punch.

I love, love, love all of the new Framelit collections, and we used the Window Framelits on this card.
The smaller one was stamped with the big, gorgeous flower from Betsys Blossoms set, then mounted onto a bigger Baja Breeze window.


It's so obvious sometimes just how much Stampin' Up! spoil us with co-ordinating products, such as stamps and punches.  The bird, also from Betsys Blossoms, was stamped onto Whisper White in Rose Red ink, and quite a few of the class spent a little while looking for the punch............. and then I told them they were going to have to cut it out the old fashioned way - with scissors!!!! Shock, horror...............

The sentiment is from Sweet Essentials, fast becoming a favourite of mine!  Then we finished the card with some punched flowers, topped with Rhinestones for some sparkle.

More cards to follow in a few days xxx
 
Julie Halls
Independent Stampin' Up! Demonstrator
07786266722 / 01256 335270

What I Used:
Rose Red card and ink / Baja Breeze card / Whisper White card / Rich Razzleberry card / Daffodil Delight ink / Floral District DSP / Scallop Border Punch / Betsys Blossom stamp set / Sweet Essentials stamp set / Window Framelits / Itty Bitty Punch Pack / Basic Rhiestones

Monday, 23 January 2012

A late arrival............

Just a quick card to show you today. 
This is one I made for my friends when their little girl finally appeared in the world!  Their baby was born at the end of November, but seeing as they have such a love for Penguins I couldn't resist using the Polar Party stamp set and adding this cute little penguin popping out of the pram!


The colour combo is So Saffron, Certainly Celery and Pretty In Pink.  The shading on the pram image from Bundle of Love was done using an Aqua Painter with the ink pads, though you have to be careful not to overload the paper with water or it will buckle.  An alternative would be to stamp the image on water colour paper.

I used the Scallop Border Punch for the bottom strips of card and added the name using the Medium Sizzlit Alphabet Dies.

Thursday, 22 December 2011

Finally the last card from class!!!

Oh my, oh my.................  it's only 3 days left until Christmas and I have been such a bad blogger of late that I'm sure to be crossed off Santa's list!!!  I hope it doesn't work like that.........

I'm finally getting around to posting the final card from my Christmas Card Class at the end of November.  Since then there has also been a December class where we did thank-you cards, and I will try really hard to get those posted before the New year rolls around.

Unfortunately I'm working between Christmas and New Year, but I hope to have a play with loads of NEW Stampin' Up! goodies that have been arriving these past few weeks on my doorstep.  I;m sure it hasn't escaped anyone's attention that Stampin' Up! are for the first time ever releasing a SPRING MINI catalogue on 4th January!  There are lots of lovely things, and I hope to post a few sneak peeks for you over the next week.

However, on with today's card.................

A lovely Christmassy Santa Owl punch art card that was inspired by a card I saw on a sample board at Convention.  I'm not sure who's the card was, but I changed mine up a little.


The card base is Old Olive, with a night sky layer of Night of Navy.  I stamped some snowflakes in Whisper White from Serene Snowflakes stamp set.  The roofing is Basic Gray card, punched with the Scallop Border Punch and dauber with Whisper White ink.  The Chimney is a 1 1/4" Square of Textured Cajun Craze, lined up with another piece punched with the Word Window Punch.  Again these were daubed for a snowy effect.
My owl was punched from Chocolate Chip card.  I stamped the Santa Suit image from Tags til Christmas and punched it using the Owl Punch for the chest piece, and added eyes and a Santa hat.  The present is simply a piece of Daffodil Delight punched with the 1 1/4" Square and then tied with some Linen Thread.

I used this design for another card which I will show you before the year is out.  One of the girls at work asked me to make cards for her Grandsons.  One of them has never had anything with his name on as they can never find it.  I also had a very strange request for a Christmas card relating to peanuts!!!!  I worked with it and was really pleased with the results.............  Check back to see what on earth I am talking about!

Sunday, 4 December 2011

Card Class - Christmas Time Card 1

Hello,

This is the first of five posts to show you the cards we made during my recent Christmas Card Class.  
The class was mainly focused around the stamp sets Serene Snowflakes and Contempo Christmas, but also included a punch art card, plus a bit of heat embossing and Big Shot use.

I really enjoyed prepping for this class and made some of these cards myself to send to friends.
 
This first card uses the gorgeous glitter polka dot paper from the Holly Berry Bouquet DSP pack.  It's so shimmery and pretty, the camera really doesn't do it justice.  I layered this paper onto a Lucky Limeade card base, and added a panel of Real Red card that had the edges punched with the Scallop Border Punch, and some Lucky Limeade Ruffled Ribbon tied round.


The tree image from Contempo Christmas was stamped on Lucky Limeade ink onto Whisper White and mounted onto Lucky Limeade card.  It was added to the main card with Dimensionals.
I added some Christmas bling with lots of lovely Rhinestones.

Here's a closer look:

The Details: 
Card / Paper - Lucky Limeade / Real Red / Holly Berry Bouquet DSP
Stamps / Ink - Contempo Christmas / Lucky Limeade
Embellishments - Basic Rhinestones / Lucky Limeade Ruffled Ribbon
Tools - Scallop Border Punch / Trimmer / Dimensionals

Wednesday, 30 November 2011

Quick Christmas Cards

Well, another day, another Christmas themed post!!!!

It is pretty much December, so Christmas is upon us in a big way.
I have three more craft fairs to attend, details will be on my blog later today, and then I will be busy making my own Christmas cards to send and wrapping presents, and preparing for having everyone over to my place for Christmas Day.  It's the first time ever, so I'm very excited!!!!

Back to the cards today though!

This first one is a 4 inch square card, stamped with the tree image from Contempo Christmas.  I love this set so much and have had great fun using it these past few weeks.
I used markers to ink the image so that I could get the different colours together.  Christmas classics, Old Olive and Cherry Cobbler, along with a little Daffodil Delight for the star.
The DSP I have used to layer it are retired Jolly Holiday papers from last years catalogue.  I'm trying to use up all of my old stash.
I do think this would also look fab with the Holly Berry Bouquet DSP, and just change the colours for Real Red and Wild Wasabi, two of my favourites together :o)

This second card is one for the kids, with the fun little images from Every Little Bit.  This is a brilliant stamp set with 28 different images covering all sorts of themes.
I've picked out the Christmasy ones to use here.  All of them were inked with markers, again this allowed me to mix my colours which was especially useful with the penguin.  I didn't want any of that Basic Black getting into my Pumpkin Pie beak and feet!!!

I punch the images out with the 1 1/4" Square Punch and Layered them onto Scallop Punch pieces of Poppy Parade and Island Indigo. 

The middle image was popped up on Dimensionals.
The backing DSP is from the 11/12 In Color Paper Stack in Pool Party, as is the Scallop Oval for the sentiment.  The sentiment is from Petite Pairs, again a stamp set that covers all occasions.


I hope you like my offerings today.  I really had fun making two such different cards, and hopefully a few of them will sell at the weekend :o)

The Details: 
Card / Paper - Poppy Parade / Old Olive / Jolly Holiday DSP (retired) / Pool Party DSP (In Color Stack) / Island Indigo / Pool Party / Whisper White / Very Vanilla
Stamps / Ink - Contempo Christmas / Old Olive / Cherry Cobbler / Daffodil Delight / Poppy Parade / Basic Black / Pumpkin Pie / Island Indigo / Every Little Bit / Petite Pairs
Embellishments - None
Tools - Scallop Border Punch / 1 1/4" Square Punch / Scallop Square Punch / Scallop Oval Punch / Large Oval Punch / Trimmer / Stampin Scrub and Mist / Dimensionals

Sunday, 6 November 2011

New Product Card Class - Pennant Parade Birthday

Hello lovelies!

I hope you are enjoying my showcase of card from October's class.
The card today was based on one from a recent training event that we all made.  In training we used the Just Add Cake DSP and co-ordinating cards and ink, plus the luscious Scallop Dotty Ribbon.  I have changed things up slightly to incorporate the oh so pretty Cheerful Treat DSP that is one of the bargain Hostess products that can now be bought.

For anyone that doesn't know, hostess pounds have replaced hostess levels - and it makes things so much more versatile.  For the minimum qualifying party total or individual order of £150, you now get £25 hostess pounds.  There are gorgeous hostess only products you can buy at discounted prices, or you can spend it on anything in the main catalogue, or mix and match.  A pack of these papers in only £8 hostess pounds, so you still have enough left to get a stamp set or even two!!!!  Bargain..............

Right - back to the card :o)

The base is Bashful Blue, with a layer of Concord Crush that has been punched on the top and bottom edges with the Scallop Border Punch.  Lots of layers here as we then have Melon Mambo and finally Whisper White.  The Whisper White has been stamped with the star and sunburst images from Pennant Parade stamp set, inked in Lucky Limeade and Melon Mambo.  
The Cheerful Treat DSP has been used with the Pennant Builder Punch to get the banner, and the happy is stamped in Melon Mambo with the Just Perfect Alphabet then punched with the 3/4" Circle Punch.

Along the bottom there is Lucky Limeade Ruffled Ribbon and punched with the Modern Label Punch is the sentiment from another hostess product called Happiest Birthday Wishes.

This layout is fab and could be done in so many different colour combinations, and all you need to do is grab some DSP and take the colours from there.  So simple............

Why not have a go?

The final card from Octobers class uses the Pennant Parade stamp set for another Christmas themed card.  Be sure to come back and have a look.

xxxx

The Details: 
Card / Paper - Bashful Blue / Concord Crush / Melon Mambo / Whisper White / Cheerful Treat DSP
Stamps / Ink - Just Perfect Alphabet / Happiest Birthday Wishes / Melon Mambo
Embellishments - Lucky Limeade Ruffled Ribbon
Tools - Scallop Border Punch / 3/4" Circle Punch / Pennant Builder Punch / Modern Label Punch / Paper Snips / Dimensionals / Trimmer / Stampin Scrub and Mist / Sticky Strip

Sunday, 31 July 2011

Double Challenge Sunday

Hello,

I hope you are enjoying the sun on this glorious day :o)

I have a card to show you that I quickly made today, I didn't want to be spending too much time indoors!
I tend to shy away from colour challenges and stick with sketch ones instead, so today I decided to combine the two.
The sketch is from The Paper Players and the colour combo from Just Add Ink - Not Quite Navy / Chocolate Chip / Certainly Celery / Sahara Sand

My card base is Not Quite Navy.  I stamped the circles pattern from the Confetti stamp set inked in Versamark all over the card for a subtle background.
The next layer is Sahara Sand and I used the Scallop Border Punch along the bottom edge.  The sentiment is from Just Believe, inked in Not Quite Navy, then a strip of Not Quite Navy card was added above with a Certainly Celery Designer Button.  The butterfly from Strength and Hope has been stamped on Confetti Cream card twice in Chocolate Chip and Certainly Celery, and then one of each colour cut out.  I curled the wings of the cut ones and then added them to the card with Dimensionals.


Right, time for lots of Sunday chores now, plus some sunshine time :o)

The Details: 
Card / Paper - Not Quite Navy / Sahara Sand / Confetti Cream
Stamps / Ink - Confetti / Just Believe / Strength and Hope / Not Quite Navy / Certainly Celery / Chocolate Chip / Versamark
Embellishments - Designer Button
Tools - Scallop Border Punch / Paper Snips / Trimmer / Stampin Scrub and Mist / Snail / Dimensionals

Sunday, 24 July 2011

Simply Stampin' Colour Challenge

Hello everyone,

I wanted to post the card I made using the Simply Stampin Challenge colours as inspiration.  The colours for the challenge were Real Red, Poppy Parade, Certainly Celery and Whisper White.

I went with quite a simple design using the Just Believe large flower image, inked in Certainly Celery and stamped onto Whisper White.  I wrapped 1/8" Real Red taffeta ribbon around the bottom and layered this onto a piece of Real Red Designer Series Paper that had a scalloped bottom edge created using the Scallop Border Punch.  Both of these layers were then mounted onto the card base of Certainly Celery.


I used the Platinum Shimmer Paint and a Sponge Dauber to apply it to the Boho Blossoms image in the Punch Potpourri stamp set (Level 1 Hostess) and stamped this onto Poppy Parade card.  I punched this out with the Boho Blossom Punch, and then stuck them to my Just Believe image with glue dots.  I added a Basic Rhinestone to the center of each flower, and then stamped the sentiment below the image in Platinum Shimmer Paint also.

The Details: 
Card / Paper - Certainly Celery / Whisper White / Poppy Parade / Real Red DSP
Stamps / Ink - Just Believe / Punch Potpourri / Certainly Celery / Platinum Shimmer Paint
Embellishments - Basic Rhinestones / 1/8" Taffeta Ribbon
Tools - Scallop Border Punch / Snail / Glue Dots / Sponge Dauber / Trimmer / Stampin Scrub and Mist / Boho Blossom Punch

Thursday, 7 July 2011

Garden Green

Afternoon - another day whizzing by!
I'm not quite sure what happened to yesterday, but I did have quite a long lay-in after it taking 3 hours to get home from the Take That concert!  But.......  it was AMAZING...............
Our seats were pretty far back, but there were big screens up so we didn't miss a thing.  The set was brilliant, the play list covered everything from 4 man Take That, Robbie on his own, then all together doing new stuff and then they went back and did a load of songs from the old days.  A real mix that had everyone up on their feet singing and dancing along.  Hearing the whole of Wembley Stadium singing Angels while Robbie Williams just watched is something I'll not forget.  Pure magic!

Anyway - back to reality and a quick card I made.


After making cards to send to lots of the ladies I met over the weekend I had a few scraps left and thought I'd use them up.  I teamed some Garden Green card with Woodland Walk DSP and the Every Little Bit stamp set images which I coloured with my Aqua Painter and Markers.  Really simple layering with Very Vanilla and Crumb Cake circles, plus a Scallop Border Punched from Early Espresso.  The sentiment is from the very versatile Plane and Simple stamp set.
The layout is from last weeks Clean and Simple Stamping sketch which I think I just about have time to enter.

Right - off to see my mum and dad now, with maybe a trip to the garden centre for some plants as the back garden needs some brightening up.  I do hope the rain stops :o)
Enjoy your day xxx

The Details: 
Card / Paper - Garden Green / Very Vanilla / Crumb Cake Textured / Early Espresso / Woodland Walk DSP
Stamps / Ink - Every Little Bit / Plane and Simple / Early Espresso / So Saffron / Pumpkin Pie / Old Olive / Pink Pirouette
Embellishments -  None
Tools - Scallop Border Punch / 1" Circle Punch / 1 1/4" Circle Punch / Aqua Painter / Stamp-a-ma-jig / 2-way Glue Pen / Dimensionals / Trimmer / Stampin Scrub and Mist

Saturday, 25 June 2011

My Birthday Card for Rachel

Finally we are on to the card I made for Rachel from me and my OH.
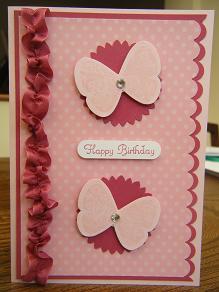
I went pink, pink,pink with this one and thought she'd love butterflies :o)


The card base is Pink Pirouette and I mounted Rose Red card and Pretty in Pink DSP on top with a Scalloped Border Punched edge.  I double punched Rose Red card with the 1 3/4" Scallop Circle Punch.  The butterflies are from the Butterfly Prints stamp set and are inked in Pink Pirouette also.  The effect is very subtle.  I added some sparkle with a big Basic Rhinestone on each butterfly.
I did this lovely effect with the ribbon by fraying one end and then grabbing a couple of threads and pulling on them.  This gathers the ribbon together so you just have to push the gathering down the ribbon and keep going pulling until you have the length of gathered ribbon you need.  It's stuck down using sticky strip.
The sentiment is actually from the USA Stampin' Up! set called Create a Cupcake.  I really hope we get this in the 2011/2012 catty - I have my fingers crossed :o)

Right, that's it for today.  I'm off to meet Hayley Gillie and discuss the stall I'm helping out with next weekend at the ArtStamp show at Newbury Race Course.  If you live nearby, pop along and see what wonderful Stampin' Up! products and cards are on display and take part in a make and take project as well.
I'm really looking forward to it!

The Details: 
Card / Paper -  Rose Red / Pink Pirouette / Whisper White / Pretty in Pink DSP
Stamps / Ink - Create a Cupcake (USA only) / Butterfly Prints / Rose Red / Pink Pirouette
Embellishments - Basic Rhinestones / 1/2" Rose Red Seam Binding Ribbon
Tools - Scallop Border Punch / Butterfly Punch / 1 3/4" Scallop Circle Punch / Word Window Punch / Sticky Strip / Snail / Dimensionals / Trimmer / Stampin Scrub and Mist