About Me

My photo
I have been a Stampin' Up Demonstrator for almost two years now, and when I signed up it was just for the starter kit and discount on products........ I never imagined it would snowball into being a business like it has. I am a new Mummy to my little boy, Isaac, who is almost four months old now. I am spending my maternity leave enjoying watch him grow up, becoming his own little person, and also trying to build my business up. Stampin' Up! have amazing products and I would love to share my crafting passion with as many people as possible. I am always putting through orders, so if you need anything, or just want some information or advise, please do not hesitate to contact me. If you want to try before you buy, then check out my classes and get booked on.
Showing posts with label Basic Pearls. Show all posts

Tuesday, 18 June 2013

Florals……….

Good Afternoon,

I have a couple of cards to share with you today from a class I ran in March.  Needless to say, I am a little behind with my blogging!

The first is a bright, simply layout. 

 IMG_1876 

I love all of the designer papers, but so often never get round to using them, so in this class I tried to fit quite a few in. 

The single stamp, Beautiful Birthday, is one of my favourites and I will be sad to see it go at the end of this month.

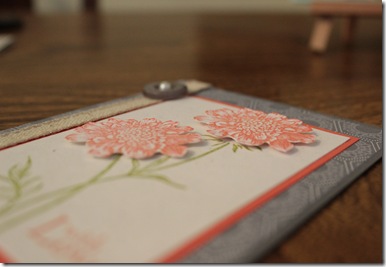
The next card has a softer feel to it.  The stamp set is Field Flowers which is just gorgeous.  The flower heads have been cut out and popped up with Dimensionals.

IMG_1877

The DSP used for the background layer is Twitterpated.

IMG_1879

It's now less than two weeks until the NEW 2013/2014 catalogue is released, which means it's also less than two weeks until the retiring items will be gone!!!!!

Contact me to reserve your copy of the new catalogue, and to place your retiring items order.

Julie Halls

07786266722

01256335270

craftybugjules@yahoo.co.uk

http://www.the-crafty-bug.blogspot.com

http://the-crafty-bug.stampinup.net

Thursday, 14 March 2013

Hi there!

I'm finally back with a couple more cards to show you that we made at February's card class.

This card is my favourite from this class.  I just love the subtle colour of Wisteria Wonder against Crumb Cake..........


The base card is Naturals Ivory, which has lovely little speckles through it and makes for a more sturdy base than Very Vanilla or Whisper White card.  
The Crumb Cake layer has been embossed using one of the Needlepoint Border Embossing Folders.  One of the stunning Tea Lace Paper Doilies has been cut in half and layered with an Elegant Eggplant Scallop Circle, then topped off with some of the lovely Flower Trim.

The butterflies images are from Papillion Potpouri stamp set and have been punched using the Elegant Butterfly and NEW Bitty Butterfly punches :o)


Finally a sentiment from Sweet Essentials was added along with some Itty Bitty punched flowers and lots of elegant Basic Pearls!

This next card is very quick and simple!
I took the colour inspiration from the Print Poetry DSP Stack (48 sheets of 11.4x16.5 DSP for only £6.25 - bargain!)


The base card is Summer Starfruit, then a layer of Midnight Muse and then DSP.  The flower images are from the new Secret Garden stamp set, which has a fabulous matching Framelit Die set....... this makes cutting the flowers out so much faster than with scissors.

The sentiment is from Petite Pairs, and lastly I have coloured some Basic Pearls with the silver Stampin' Dazzle Marker :o)

Stunning cards can be made quickly and simply when you have wonderful co-ordinating products, and that's what Stampin' Up! do so very well.

If you'd like to come along and join in a class and have a go with the products yourself, then check my upcoming class listing - HERE

I still have 1 space left on the March and April classes.

Thanks
Julie x


Julie Halls
Independent Stampin' Up! Demonstrator
07786266722 / 01256 335270

Friday, 30 November 2012

October Card Class - New Products Card 5

Hi there,

This is the final card we made at my October New Products card class.  It seems like we did this ages ago now, I'm not sure where the past 6 weeks have gone......

I love this triple stamping technique.  It does use quite a lot of card, but it's so simply to actually put together and gives such a great effect.

We used Elegant Eggplant card for the coloured layers, which measure:

A5 base / 12.3 x 8 cm / 9.8 x 5.5 cm

The plain layers were Very Vanilla, which measure:

14.3 x 10 cm / 11.8 x 7.5 cm / 9.3 x 5 cm

We used a little dab of glue to hold all of the Very Vanilla pieces together, which were then stamped with various butterflies from Papillon Potpourri in Elegant Eggplant and Wisteria Wonder inks.
You get little gaps where the pieces of card layer up, but one you mount them all onto the coloured layers these gaps can't be seen.


Once stamped, then glue the layers of Very Vanilla and Elegant Eggplant together, remembering to wrap any ribbon, or bakers twine in this case, around the smallest layer, before finally gluing them all together.

It's not completely clear in the picture, but one butterfly was stamped on scrap and punched out with the gorgeous new Butterfly Punch, then we daubed the edges and stuck it to the front with glue dots so the wings could be bent out a little.  Basic Pearls were added for the body.

Next I will be sharing with you all of the birthday stamp a stack projects we created in the afternoon card class for October :o)

Have a fab day
Julie x


Julie Halls
Independent Stampin' Up! Demonstrator
07786266722 / 01256 335270
craftybugjules@yahoo.co.uk

What I Used:  Bitty Buttons / Wisteria Wonder Bakers Twine / Butterfly Punch / Papillon Potpourri stamp set / Fabulous Phrases stamp set / Clear Block G / Basic Pearls / Wisteria Wonder ink / Elegant Eggplant card and ink / Sponge Dauber / Very Vanilla card

Tuesday, 25 September 2012

Retiring Products Class - card 5

Hello.........

We have come to the last card from the class I rencently ran using retiring products.  

I am planning on a few posts to showcase some of the Autumn/Winter Seasonal Catalogue products over the next week, and maybe even a sneek peak or two at some 12/13 Catalogue products too........
Oh, so much new stuff...........  it's fabulous :o)

Anyway, back to this card, which has a bit of a vintage feel to it.

The card base is Basic Gray and I have teamed it with Concord Crush, one of the retiring In Colours.  The first layer has been embossed with the Vintage Wallpaper Embossing Folder.  

The image withint the Oval Embossed Frame is from Clearly for You.  I love this stamp set and will be sad to see it go.  I really never used it enough, and now it's just too late!


The background image was stamper in Blushing Bride, another retiring In Colour, and the blackberry image (or raspberry's when red!) were inked with markers - Concord Crush and Pear Pizzazz. 

The sentiment is from Oval All (retiring) and we added some punched little flowers with a little pearl in the centre.

Finally, we added a length of Chantilly Crochet Trim.  This is another retiring item, and I have used this a lot over the past year so will really miss it.  Thankfully the Victoria Crochet Trim is sticking around :o)

So, have you seen anything on these class cards that you didn't realise was retiring???  Have you got your orders in for all of those items you have been wanting to purchase over the past year???

If the answer is no, check out the retirement lists on the right hand side of my blog and get an order in quick.  There's only a few days left and so mcuh has already sold out........

Julie x

Julie Halls
Independent Stampin' Up! Demonstrator
07786266722 / 01256 335270

Sunday, 23 September 2012

Retiring Products Class - card 4

Wow, I can't believe I've actually managed to have a consistent week of blogging!!!  I do hope I can continue on this path, but I won't make any promises!!!!
This is card number 4 from class last weekend and features one of my favourite A la Carte stamps from the 11/12 catalogue - Triple Treat Flower.
I've teamed Peach Parfait (retiring 10/11 In Colour) with Old Olive and Whisper White, using the Perfect Polka Dot Embossing Folder on the background layer.  The sentiment is from Petite Pairs.


The flower was stamped twice, once in each colour, and then we used the Fancy Flower Punch on one, and the 5 Petal Flower Punch (retiring) on the other.  They were layered with Dimensionals between and finished off with a Basic pearl in the centre.
The leaves were cut with the Big Shot and Little Leaves Sizzlit.
I liked the clean and simply styling of this card.
Only one card left to show you.  I personally think I have saved the best till last as it's my favourite :o)
Julie x 
Julie Halls
Independent Stampin' Up! Demonstrator
07786266722 / 01256 335270

Tuesday, 1 May 2012

Summer Mini Blog Hop

I cannot believe how time has flown.  No sooner has Sale-a-bration ended, and the Spring Mini has also come to a close!!!

However, that does make way for the new Summer Mini Catalogue…………  so many wonderful new products to play with :o)

You may have landed on my blog post by way of Sharon – I hoped you loved what she had to share.

My post focuses on the Bright Blossoms stamp set, and I have four cards to show you:

The first is a simple card, but very bright and bold.  I cased this layout from the very talented Teri Pocock.

Blog Hop - Summer Mini 01.05.12 001 Sadly I took most of these photos last night, so the pictures aren’t the best due to rubbish lighting!!!

I used Concord Crush and Lucky Limeade as the colour scheme, adding in some striped DSP, layering the top and bottom with a strip of Lucky Limeade card punched with the Dotty Scallop Ribbon Border Punch (oh what a mouthful!)  The sentiment is from the Hostess set Happiest Birthday Wishes.

Next I have a card that teams Island Indigo with Pumpkin Pie.  They work surprisingly well together.  I have used the stem image from Sweetheart stamp set.  The most solid flower image from Mixed Bunch is stamped in Island Indigo to line up with the stem, and then layered over the top is a Whisper White flower punched with the new Blossom Punch.  The little tulip image from Bright Blossoms fits perfectly inside each petal. 

Blog Hop - Summer Mini 01.05.12 002 I’ve used one of the new Edgelit Dies to shape one side of the card (again, apologies for the terrible piccy).  I’ve also stamped one of the flower head images over the left side of the card base to give a tone on tone effect.  The Pumpkin pie button just finishes things off nicely.

With this next card I went for a slightly retro feel.  I teamed Melon Mambo with old Olive and Basic Gray.  I used marked to ink the stamps and then punched parts of the images out with the 1 1/4” and 1” circle punches.

Blog Hop - Summer Mini 01.05.12 004 The sentiment of from Curly Cute.  I inked it with Versamark and then added Melon Mambo Embossing Powder which really makes it pop off the Basic Gray card.  The sentiment panel has been edged with Melon Mambo strip, again punched with the Dotty Scallop Ribbon Border Punch.

Blog Hop - Summer Mini 01.05.12 005

For the last card I went with a slightly Vintage theme.  I used a favourite colour combination of mine – Crumb Cake, Bravo Burgundy and Pink Pirouette.  I also added in some Confetti Cream.  I used the Distressing Tool in the Cutter Kit to rough up all of the edges, the daubed Bravo Burgundy ink around the edges of the Confetti Cream pieces. 

Blog Hop - Summer Mini 01.05.12 003 I embossed the Pink Pirouette card with the Oval Designer Frame image, then used one of the new Framelit Dies the cut around the frame.  The flower image was inked with markers and then punched with the Extra-Large Oval.  The sentiment is again from Curly Cute, and I added some Chantilly Crochet Trim in a ruffled manner across the bottom of the card.

Blog Hop - Summer Mini 01.05.12 006

I hope you have enjoyed seeing one stamp set used four different ways.  It’s a really bargain, only £11.95 in clear mount for 8 stamps, and yet so versatile!!!!  It’s one of many wonderful new products.

If you’d like to see them all, then click on the picture of the Summer Mini catalogue on my side bar to view it online, or contact me if you’d like a hands on copy posted to you.  Even better – come to my open house event this Saturday between 10am and 1pm and see the products, loads more samples and make a card to take home as well.  Full details are on my EVENTS page.

Now it’s time for you to hop along and see what Anthea has in store for you.

Thanks for stopping by – please do leave a comment and let me know what you think :o)


Full Blog Hop Listing

Group 1

1. AlisonP ~ www.craftyalisoninlyon.blogspot.com
2. Crafting Alison ~ www.craftingalison.blogspot.com
3. Sarnie - www.kraftybiker.blogspot.com
4. Pat - www.pinkycardsandcreations.blogspot.com
5. IOW Sarah- www.stampinsarahiow.blogspot.com
6. Frankiesue - www.frankiesue.blogspot.com
7. Anne-Marie - http://classycrafters.blogspot.co.uk/
8. Angela - www.sparklycards.blogspot.com
9. Elaine - www.thesassystampers.blogspot.com
10. Sara - www.craftingandstamping.com
11. FrenchieJo - www.frenchiejo.blogspot.com
12. Leanie - www.beautifulimpressions.co.uk
13. Michelle (ShellieStamps) - www.craftypaper.co.uk
14. Fiona - http://oakfieldcrafts.blogspot.co.uk/
15. Tina F -http://littlewhitehousecrafts.blogspot.com
16. (9399) Amanda - http://thecraftspa.blogspot.com
17. Ruth(mamaluke) www.artfulstampin.co.uk
18. Jan (JJ66) - http://jan-crippin.blogspot.co.uk/
19. Bluedaisy (Tracy) - http://bluedaisydaydreams.blogspot.co.uk/

Group 2

20. Nuttysgirl (Emily) - http://www.stampinmermaid.blogspot.co.uk/
21 CarolynUK - http://stampaholix.blogspot.co.uk/
22 Allyf - www.serendipitypapercuts.blogspot.com
23 Vronie www.vronstampin.blogspot.com
24 Kim www.kimfeecrafter.blogspot.com
25 Beckie (Littlebeckie) www.bextiesandstickytape.blogspot.com
26 Sally http://girliepink.blogspotcom
27 Christa http://serendipity-stamping.blogspot.co.uk/
28. DonnaM www.head-over-heels-by-dlm.blogspot.com
29 Laura http://airingcupboardstamping.blogspot.co.uk/
30. Emma H http://emma-letsstamp.blogspot.com/
31. Margaret K www.makingpapercrafts.blogspot.com
32. Kate http://stampinupwithkate.blogspot.co.uk/
33. Sarah http://esellek.blogspot.co.uk/
34. Jayne http://jaynescraftycorner.blogspot.co.uk/
35. Clare http://sparklecrafts.blogspot.com
36. Sharon http://stamps-n-inks.blogspot.co.uk/
37. Julie http://www.the-crafty-bug.blogspot.comYou are HERE
38. Anthea http://stampin-divas.blogspot.co.uk/
39. Vicky http://vickylouscorner.blogspot.com

Tuesday, 27 March 2012

More Sale-a-bration

I have a couple more cards to share with you today :o)

The first cards uses the Sprinkled Expression stamp set.  I have stamped the star image in Versamark Ink and added Clear Embossing Powder over the top.  Once heat set I have then used Peach Parfait ink and sponge daubed all over.  This is mounted onto a 2 3/8 Scallop Circle of Poppy Parade.  The base is Poppy Parade, layered with Soft Suede and then three strips of Everyday Enchantment DSP.  The sentiment is stamped in Poppy Parade ink and mounted onto a 1 3/8 Circle of Poppy Parade card.

Class Projects 17.03.12 032

The next card uses the gorgeous Fresh Vintage stamp set, along with one of the sentiments in the Elementary Elegance set.  The card starts of with a Poppy Parade base and a Pool Party layer.  I’ve added some Everyday Enchantment DSP and used the 1/2” Circle Punch to bite into the corners where I’ve then added a Basic Pearl.  The tag was cut from Very Vanilla card and sponge daubed with Soft Suede ink.  I used markers to colour the image, and underlined it with the wavy image in Poppy Parade ink, with the sentiment in Soft Suede to one side.  Lastly I punched a hole and added some Pool Party Ruffled Ribbon.

Class Projects 17.03.12 030 

If you have yet to get some of the wonderful Sale-a-bration sets, then don’t delay.  Order today as they are only around for a few more days!!!!

Julie halls – 07786266722 – craftybugjules@yahoo.co.uk

Saturday, 10 March 2012

Cupcake Class

Back in January when the Spring Mini Catalogue first launched, I couldn’t wait to get started with the simply yummy Create a Cupcake stamp set and co-ordinating Cupcake Builder Punch………  So that’s what my first class of the year was based around – 5 cards showcasing all of the things you could do with that stamp set and punch…….  and there’s a lot!

I can’t believe I haven’t posted about these long before now, especially as all Spring Mini products are only around until 30th April……….  after this time you cannot order them, unless of course they make a re-appearance in the main Ideas Book and Catalogue 12/13 when it launches in October.  That’s a long time to wait, so don’t delay in getting your hands on this lovely duo :o)

As I’ve been such a bad blogger of late I am going to try and make up for it by posting all five cards we made in one hit! 

So first we have a cute little basket of flowers.  This is a 4” x 4” card base with a layer of DSP.  One of the cupcake wrapper images has been stamped in Marina Mist, then punched out for our basket.  The flowers were stamped and hand cut, and I used a Mini Glue Dot to adhere each button over the top.  Notice the little leaves still poke out from behind.  I used the sprinkles image to stamp around the edge of the Rose Red layer, which has been double punched with the 2 3/8” Scallop Circle Punch.  The simple sentiment has been inked in Rose Red and punch out with the Word Window Punch.

Cupcake Card Class 21.01.12 (3)

Next up we have three lovely handbags!  Each of the handbags is made from an upturned cupcake wrapper.  I stamped the wrapper image in Melon Mambo and Elegant Eggplant onto the same coloured card stock before punching.  The handbag flap is made from the Small Oval Punch and the handles from the Medium Oval Punch, with a Mini Brad for the fastening.  The handbags have been mounted onto a piece of card punched with the Scallop Square.  I finished the card of with a strip of Elegant Eggplant Dotted Scalloped Ribbon and the sentiment stamped in Melon Mambo ink directly onto the Crumb Cake card base.Cupcake Card Class 21.01.12 (4)

The ballon card is one of my favourites and would make a great boys card!  I used a scrap piece of card and punched a cupcake topping, then used this as a mask for the clouds which I daubed into the Whisper White Top Note piece with Pool Party ink.  The basket of the balloon is a cupcake wrapper punched out of Soft Suede card and then run through the Big Shot in the Lattice Square Embossing Folder.  The balloon is 3-dimensional and made from 5 punched 1 3/8” Circles – 2 x Daffodil Delight / 3 x Real Red.  I linked the two up with Linen Thread and stamped the Happy Birthday in Real Red ink. 

Cupcake Card Class 21.01.12 (8)

I love the colour combination for the ice-cream card :o)  Pool Party / Island Indigo and Pretty In Pink, with a splash of Chocolate Chip thrown in.  The cone was punched using the Pennant Punch, though you could easily cut a triangle for the cone.  This was embossed like the balloon basket, then I sponge daubed over the edge to give it a more life like quality.  The ice-cream scoops are actually cupcake toppings!  The two 2 3/8” Scallop Circles help the highlight the ice-cream, and I’ve mounted it all onto a piece of Pretty in Pink that’s been embossed with the Perfect Polka Dots Embossing Folder.  Add some Island Indigo Ruffled Ribbon, tie a bow, and pop in an In Colour Printed Designer Brad and your done!

Cupcake Card Class 21.01.12 (7)

Finally we have my favourite card – Cupcakes as Cupcakes, looking very yummy and ready to be eaten!  The base is Crumb Cake, with some scrumptious So Saffron Designer Paper layered on top.  The windows were made from a piece of Soft Suede card topped with 4 Blue Bashful squares punched with the 1 1/4” Square Punch.  A little lazy as they’d be easy to cut, but if you have the tools you may as well use them!  The awning was made with a strip of Regal Rose card, scored twice and folded, then I used the Scallop Border Punch along one edge.  I did the same with the table piece, which was a Regal Rose piece punched with 2 3/8” Scallop Circle Punch.  Then I had fun with the cupcakes, using different wrapper stamps and colours, adding multi coloured sprinkles, a cherry and some of the tiny Basic Pearls.
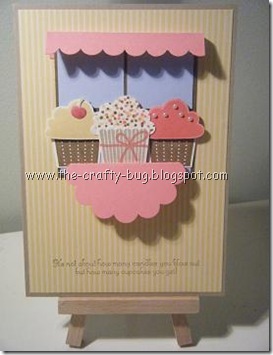
Cupcake Card Class 21.01.12 (13)

I really love how versatile this stamp set and punch are.  The sentiments are cute and I love the actual font, it’s delicate and refined.

I you have been pondering on getting these items, then I hope seeing these cards might have helped you realise you NEED them!  I sincerely hope they make it into the Main Catalogue in October.

Have a fabulous Saturday

Julie x

Saturday, 11 February 2012

SAB – Fresh Vintage

Hi, I hope everyone is having a good weekend. 

I have a few more Sale-a-bration creations to share today.  I know with so many of us having attended Cate’s baggie book event, you will probably have seen these cards numerous times over if you hop across a lot of SU Demo blogs!  So, you’ll probably be pleased to know that after this post I shall be showcasing cards from my last class based around the Create a Cupcake stamp set and Cupcake Builder Punch, plus some other lovelies……….

So on with the show:

The first card uses the flower image to create a gorgeous background on Pool Party card.  The base is Crumb Cake and I used the Ribbon Border Punch to create a little scalloped edging at the top and bottom where the Pool Party meets the Crumb Cake (quite hard to see in the picture though).  The butterflies have been punched from some Everyday Enchantment DSP with the Butterfly Punch, then a bit of Linen Thread tied round and a Basic Pearl added.

SAB Cards Jan 2012 018

The second card has a Basic Gray base and the circle image from the set has been stamped in Versamark down the left edge three times.  Some Whisper White has been mounted on Pear Pizzazz card, then the floral image stamped on top.  The Fancy Flower punch was used for the two flower layers in Pink Pirouette.  The top flower has been scrunched, then an Antique Brad put through them both.  The sentiment is from Teeny Tiny Wishes, made into a banner and Basic Pearls added to each end.

SAB Cards Jan 2012 022

The next card has a base of Pumpkin Pie onto which the wavy design stamp in the set has been added for a background.  Onto this is a panel of Whisper White which like the first card is edged top and bottom with the Ribbon Border Punch.  The floral image has been inked using markers to get the different colours, then stamped in two corners.  The butterfly is cut using the Big Shot and Beautiful Butterflies Die, then it has been stamped with the floral image and Versamark ink.  This is then heat embossed with Clear Embossing Powder. 

SAB Cards Jan 2012 019SAB Cards Jan 2012 020

The final card is probably my favourite out of every card we made.  I’m not usually a fan of Whisper White card bases, but it works so well with this card.  It is teamed with Soft Suede for a centre panel with another strip of Everyday Enchantment DSP.  The bottom section of the card has been embossed using the Big Shot and Perfect Polka Dots Embossing Folder.  The stamp image has been inked with Poppy Parade ink, then trimmed square and mounted onto a Scallop Square of Soft Suede.  Finally Hello was stamped in Soft Suede ink.  Simply gorgeous!

SAB Cards Jan 2012 021

So if you have been inspired and really would love to get your hands on one (or all!) of the Sale-a-bration sets, then get in contact.  I can certainly help you with information on any items you might be interested in, or if you are new to Stampin’ Up! products then why don’t you come along to one of my classes and get your hands on the products – try before you buy so to speak!

See details about upcoming classes HERE

Have a fabulous evening xxx

Wednesday, 25 January 2012

Sale-a-bration Showcase

Hello everyone, I hope you are having a fabulous week!

Over the next few days I am going to share with you a number of projects using the Sale-a-bration stamp sets and Designer papers.  I was very lucky to take part in a craft day with a number of other members of the Blue Angels – my stampin up nanna Cate’s team!!!  We spent the day making four cards with each of the four stamp sets, so 16 cards in all…………….

Here are just a few of the cards made with one of my favourite sets – Elementary Elegance

SAB Cards Jan 2012 010

The first is card is using one of the sentiments from this set which has been stamped inside the Designer Frame Embossed Oval.  A bit of sponge daubing, tearing, some pearls, a strip of SAB Designer Paper trimmed into a banner and a layer of Marina Mist card embossed with Perfect Polka Dots, all on a Crumb Cake base and voila!!!!!

SAB Cards Jan 2012 009 

This is a little square card with a Pumpkin Pie base.  The frame image has been stamped on Whisper White in Soft Suede, then stuck to a Night of Navy layer before punching out the centre with the Curly Label Punch.  The Hello image was stamped and cut into a banner, then the Crown image was stamped in Night of Navy and cut out to adorn the sentiment.

If you would like to get your hands on this lovely stamp set then you simply need to select products from the Main Idea Book & Catalogue and/or the Spring Mini Catalogue amounting to £45……..  And with so much to choose from, maybe you’ll end up needing to select two free sets – you get one for each £45 you spend after all!

Contact me to place and order, or if you’d like any further information about hosting a party and getting more products for FREE

Julie Halls

07786266722 / craftybugjules@yahoo.co.uk

Thursday, 19 January 2012

ILWS – Simply Adorned Insert Swap

Oh wow, I’m really loving the new Simply Adorned product range in the Spring Mini Catalogue.  have you seen what’s on offer????

Chains, bracelets, jewels and charms……………….  all so fabulously gorgeous, and they can be simply altered to suit any outfit!

The charms come in four sizes, all locket style with a hinge that easily allows you to insert customised artwork or photos.

I joined in a swap on In Love With Stamping so I could get lots of lovely inspiration and samples.  I  made 10 of each inserts to fir the larger size charms, 2.5cm x 2.5cm and 3.2cm x 2.5cm.

This first one uses the Charming stamp set, specifically designed with images to fit the inserts.  This insert is for the largest charm.

Simply Adorned Insert Swap Jan 2012 (4)

The first side has the script background inked in Pool Party, then stamped off before stamping onto the Confetti Cream base card.  Over the top I have inked the circle image in Wisteria Wonder and added tiny pearls.  The butterfly image is inked in Perfect Plum and daubed with Champagne Simmer Paint before stamping onto the card.

Simply Adorned Insert Swap Jan 2012 (5)

Flip the card over and on the other side we have the floral image.  I used markers to ink this image so I could get the flowers a different colour from the foliage.  Marker used were Perfect Plum and Pear Pizzazz.  The wording is from You’re a Gem stamp set and is inked in Chocolate Chip.

Simply Adorned Insert Swap Jan 2012

The second insert for the swap is for the square Charm.  I’ve used an old favourite, Clearly For You, and one of the lovely new sets in the Spring Mini, Perfect Postage, an absolute steal at only £8.95 in Clear Mount or £10.95 in Wood Mount – there are four images in the set and there is also a matching Postage Punch.  Once again the base is Confetti Cream card.

Simply Adorned Insert Swap Jan 2012 (1)

The first side I have stamped the Heart image from Perfect Postage in Real read ink.  I them used a sponge dauber to take the colour right to the edges.  The love sentiment is from Tiny Tags and I’ve used Chocolate Chip ink.  My trusty stamp-a-ma-jig allowed me to line this up perfectly, and then I added a Basic Rhinestone.

Simply Adorned Insert Swap Jan 2012 (2)

On the other side I have stamped the background image from Clearly For You in Daffodil Delight.  Like with the other insert I stamped off first to give a lighter shade.  The bird were added over the top in Cherry Cobbler ink.  The top section is a piece of Cherry Cobbler card punched with the wonderful Dotted Scallop Ribbon Border Punch.

 Simply Adorned Insert Swap Jan 2012 (3) 

I cannot wait to get my package of swaps from the others involved.  I will show you what I get over the coming weeks.

These charms really are great value as you can simply change the inserts with every change of outfit and they become completely unique!

Thanks

Julie xxx

Tuesday, 20 September 2011

Special Birthday Cards

Hello,
I hope this post finds you all well on this gloomy looking Tuesday.  The sun seems to be trying to make an appearance, but there's a definite feel of Autumn in the air.


At my card class last weekend, my most local crafty customer had a request for two cards for her niece's 1st birthday.  So while she set about tackling the 5 cards I'd designed for class, I started to pull together the cards for her niece.
I'd seen some gorgeous side-step teddy bear punch cards on the internet, so thought I'd try this for her.
She really wanted her nieces name and age on the cards, but I don't have any of the alphabet or number stamp sets yet, so I printed these bits from the computer and punched them out with the Decorative Label Punch and 1" Circle Punch, and then added the Happy Birthday sentiment from the Level 2 Hostess Set - Something to Celebrate.
The card base is Pink Pirouette and the drawers were made with the Modern Label Punch and then a Rose Red Designer Brad was added.
The teddy bear itself was made of various different circle punches and the Heart to Heart Punch and also the little heart from the Two-Step Owl Punch.
There was lots of daubing done on this card to give it some depth. 


The second card was again using Pink Pirouette as the card base, with a layer of Baja Breeze DSP which I thought kind of gave a sky backdrop.  The leaves were from the Two-Step Bird Punch.  The owl was punched from Crumb Cake card and we added a little ballerina outfit using Pink Pirouette card for the chest and Pink Pirouette DSP punched with one of the Itty Bitty Punch Pack for the skirt.  a little string of Basic Pearls were then added.  The balloons were punched with 1" Circle Punch and I again used the little heart from the Two-Step Owl Punch for the tie on each balloon and this gave me something to tie the Silver Elastic Cord to.  


While I realise a 1 year old might not be able to full appreciate these cards, at lot of work went into them and I know my card class lady, the lovely Joan, was very pleased with the results.


While these weren't the cards I actually designed for class, if you love these and would like to take part in a class and make 5 cards for yourself, then please check out my Saturday Card Class page.
There are details of the theme classes coming up over the next few months and the stamp sets we will be using.  Spaces are limited, so please contact me to book your space.

Saturday, 10 September 2011

Blog Hop - Let's Say Goodbye Together!

The Month of September brings with it mixed emotions for me.  It is sadly the time when we have to say goodbye to many products in the 2010/2011 Stampin' Up! Idea Book and Catalogue.  But.......  it also means that the sparkly, shiny new 2011/2012 Stampin' Up! Idea Book and Catalogue is just around the corner, released 1st October!

Today's mammoth blog hop celebrates all of those lovely retiring products..........

You have probably arrived here from Donna
I hope you enjoyed the creations she had for you.

I have my monthly card class today, and I based many of my cards on the retiring products, so here is what I've made.......... enjoy!

Joy Fold Card

For this little 4"x4" card I used some of the retiring DSP called Sunny Garden and also the stamp set A Flower For All Seasons.  This is just such a cute stamp set, and works great with the Aqua Painters, or just by colouring in with the Markers.  Colouring with Markers is exactly what I have done here.
I went with the autumn stamp that has sunflowers to compliment the Peach Parfait card I used along with Pear Pizzazz and, one of my favourites, Poppy Parade.
Thankfully the lovely In Colours are sticking around for another year.
The flower stopper that holds the card closed was punched with the Boho Blossom Punch and the centre is from one in the Itty Bitty Punch Pack, all held together with a Designer Brad.


Strength and Hope Card

I love this set and I didn't use it enough.  Buying this set also mean you are making a difference as £1 from each set goes to the Breast Cancer Research Foundation.
This set was in the mini and will not be available after 30th September, so get it while you can and help a great cause at the same time!
This time I have used Lap Of Luxury DSP for a background on which I stamped the gorgeous butterfly image.  I used the Rock n Roll technique with this one, inking it in Pretty in Pink and then Concord Crush.  The card base is also Pretty in Pink with the swirly image stamped in Concord Crush down the folded edge using a Stamp-a-ma-jig to line it up.  The centre butterfly is popped up with Dimensionals and has a line of Basic Pearls added for it's body.
The sentiment is from the retiring Level 2 Hostess Set - Something to Celebrate.  I stamped it and then punched it out with the Decorative Label Punch.


Top Note Patchwork Card

Again, such beautiful DSP, this time Springtime Vintage from the mini catalogue.
I've assembled squares of the papers over the top of a Whisper White piece of card, glued them all down and then ran it through the Big Shot with the Top Note Die.  I then ran it through again with the Lattice Square Embossing Folder which gives a great quilted effect.
I've simply mounted it onto Whisper White and used the Corner Rounder Punch before wrapping some Rose Red 1/2" Seam Binding Ribbon around and tieing a bow.  The sentiment is from Oval All stamp set, inked in Rose Red and mounted onto a Scalloped Oval of Rose Red.  I have used the Paper Piercing Tool and Mat Pack to add a hole to each of the scallops.
Everything was then mounted onto a Baja Breeze card base.


Plane and Simple - I'm going to miss this one so, so much!

This stamp set was just fabulous for those (what I think are harder to make) male cards!
I have grabbed some more DSP - it's all retiring you know - this time Elegant Soiree which is simply lovely.
I have made an Easel Card with Baja Breeze for the base again.  Strips of DSP have been added to the panels, then the plane image was stamped onto another piece of DSP in Early Espresso ink.  This was cut and mounted before being stuck down with Dimensionals.  The Silver Elastic Cord was threaded through the dimensionals behind the image and looped through the sentiment before being tied in a bow.  I'll miss this cord as tying it was a doddle as it was so stretchy and forgiving!  Sadly, it's already sold out, but you can still get the gold.

The sentiment is from the same stamp set, inked in Early Espresso again and stamped onto Very Vanilla.  I cut this out into a banner freehand and mounted it onto DSP and cut again to create a border.
Finally I made the stopper for the card.  The diamonds image was stamped twice onto Very Vanilla in Baja Breeze ink and cut out.  I have added it to the card with Dimensionals (quick tip - when you finish with the Dimensionals, don't throw the sheet away, use all those odd little half bits around the edge by snipping them, they are great for smaller pieces of card you want to pop up!)


Well I hope you have enjoyed looking at the cards I made and you have been inspired to take a look at the retirement list and grab some of these great products before they are gone.......

Thanks so much for stopping by.  Please leave me a comment as I love to know what people think of my creations.

From me you can now head on over to Elaine 

If you get stuck, lost or confused along the way, below is a list of all of the lovely crafty ladies taking part in the blog hop today.

1. AlisonP http://craftyalisoninlyon.blogspot.com/
2. Twintrouble (Erika) http://twintroublescreations.blogspot.com/
3. Lauralou http://airingcupboardstamping.blogspot.com/
4. Sarah (IOWhttp://www.stampinsarahiow.blogspot.com/
5. Theresa M http://my-next-chapter.blogspot.com/
6. Rozelle (LittleMoo6) http://thepapercraftsessions.blogspot.com/
7. Valerie (valmoody) http://stampingwithval.wordpress.com/
8. EmmaH http://emma-letsstamp.blogspot.com/
9. Donna (DonnaM) http://www.head-over-heels-by-dlm.blogspot.com/
10. Julie H (The Crafty Bug http://the-crafty-bug.blogspot.com/
11. Elaine (Sassy Stamper) http://www.thesassystampers.blogspot.com/
12. Sandra (Sarnie) http://www.kraftybiker.blogspot.com/
13. Natalie http://www.natalieoshea.co.uk/blog.html
14. Kimf http://kimfeecrafter.blogspot.com/
15. CarolineSkinner http://stampinupandbranchingout.blogspot.com/
16. VickyLou http://www.vickylouscorner.blogspot.com/
17. Michelle (ShellieStamps) http://michellescraftypaper.typepad.com/
18. allyf http://www.serendipitypapercuts.blogspot.com/
19. Maggiemae http://thefineartofstampin.blogspot.com/
20. Evy C http://www.evyscraftycreations.blogspot.com/
21. Niki http://www.mygroovystampinup.blogspot.com/
22. Sarah-Jane www.cardsandacuppa.blogspot.com
23. Tina( Tina Faghy) http://littlewhitehousecrafts.blogspot.com
24. Sally (Pink Sky) http://pinkskysu.blogspot.com