About Me

My photo
I have been a Stampin' Up Demonstrator for almost two years now, and when I signed up it was just for the starter kit and discount on products........ I never imagined it would snowball into being a business like it has. I am a new Mummy to my little boy, Isaac, who is almost four months old now. I am spending my maternity leave enjoying watch him grow up, becoming his own little person, and also trying to build my business up. Stampin' Up! have amazing products and I would love to share my crafting passion with as many people as possible. I am always putting through orders, so if you need anything, or just want some information or advise, please do not hesitate to contact me. If you want to try before you buy, then check out my classes and get booked on.
Showing posts with label Brads. Show all posts

Tuesday, 18 June 2013

Florals……….

Good Afternoon,

I have a couple of cards to share with you today from a class I ran in March.  Needless to say, I am a little behind with my blogging!

The first is a bright, simply layout. 

 IMG_1876 

I love all of the designer papers, but so often never get round to using them, so in this class I tried to fit quite a few in. 

The single stamp, Beautiful Birthday, is one of my favourites and I will be sad to see it go at the end of this month.

The next card has a softer feel to it.  The stamp set is Field Flowers which is just gorgeous.  The flower heads have been cut out and popped up with Dimensionals.

IMG_1877

The DSP used for the background layer is Twitterpated.
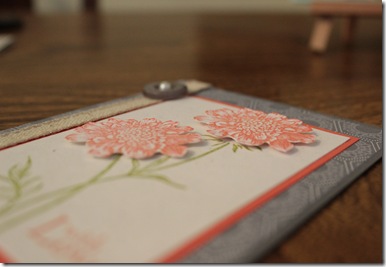
IMG_1879

It's now less than two weeks until the NEW 2013/2014 catalogue is released, which means it's also less than two weeks until the retiring items will be gone!!!!!

Contact me to reserve your copy of the new catalogue, and to place your retiring items order.

Julie Halls

07786266722

01256335270

craftybugjules@yahoo.co.uk

http://www.the-crafty-bug.blogspot.com

http://the-crafty-bug.stampinup.net

Sunday, 22 January 2012

May the force be with you................


Hello,

I just have a quick card for you today.  This photo has been sitting on my laptop since before Christmas and I figure it's time to let him shine!!!!

I found a version of this card on a blog called Sherry's Stamped Treasures, and she'd CAS'd it from Debbi's Design's Blog..............  lots of sharing going on.  


My brother loves Star Wars, and seeing as I'd got him a t-shirt from Disney Convention that said 
" Jedi Training Academy" on it, the card seemed to fit perfectly with the theme!

Having one to copy certainly saved me a lot of time, though I had to improvise and change a few of the punches used as I didn't have them (well my Bird Punch was on loan).  The other main change was due to my OH telling me the Light Saber is actually meant to have a green glow if it belongs to Yoda!!!!  Boys............  So I added this in!

My brother loved the card, so I was pleased I took the time to put it all together.  Goodness knows how long it would have taken to do it from scratch!

The Details: 
Card / Paper - Sahara Sand / Chocolate Chip / Wild Wasabi / Basic Gray / Whisper White
Stamps / Ink - Crumb Cake / Chocolate Chip / Happiest Birthday Wishes (hostess)
Embellishments - Mini Brads / Brights Brad
Tools - Blossom Petals Builder / Word Window / Modern Label / Extra-Large Oval / Large Oval (trimmed) / Boho Blossoms / 1/2" Circle / Decorative Label / 1 3/4" Circle / Sponge Dauber

Thursday, 6 October 2011

Launch Party Make and Take 2

Hi,

Time for my second make and take from the weekend!

I was still thinking about Christmas and how often a bottle of wine (or any alcohol) makes a good gift for co-workers or neighbours.  So I decided to make a bottle git tag, though when I made this one I went with nice bright colours to suit the weather at the time.
It also showcases one of the gorgeous new In Colours - Calypso Coral!!!!!  


I cut the base from Calypso Coral wide enough to allow for the Scallop Circle Punch opening to hang over the bottle top.  The scallop is Baja Breeze.
The next layer is also Baja Breeze, and although you can't really see it in the picture, it's a folder tab to write a greeting inside.
This was simply glued onto the Calypso Coral base.
The flowers are Daffodil Delight, Calypso Coral and Daffodil Delight DSP Stack.  I have run them through the Big Shot with the Fun Flowers Die, and then added a 1/2" Circle and a flower punched from one of the Itty Bitty Punch Pack.  All secured with a brad, which means you can then move the layers about to get them how you like.  I used Red Stocky Strip to secure the flowers to the Baja Breeze layer as it really doesn't budge, and any other glue wouldn't hold as well due to the brad fastening added some bulk.


I loved this quick and simple project and so did all the crafty gals at my open house.
Now who to give that wine too????  Maybe a present for myself :o)

Tuesday, 20 September 2011

Special Birthday Cards

Hello,
I hope this post finds you all well on this gloomy looking Tuesday.  The sun seems to be trying to make an appearance, but there's a definite feel of Autumn in the air.


At my card class last weekend, my most local crafty customer had a request for two cards for her niece's 1st birthday.  So while she set about tackling the 5 cards I'd designed for class, I started to pull together the cards for her niece.
I'd seen some gorgeous side-step teddy bear punch cards on the internet, so thought I'd try this for her.
She really wanted her nieces name and age on the cards, but I don't have any of the alphabet or number stamp sets yet, so I printed these bits from the computer and punched them out with the Decorative Label Punch and 1" Circle Punch, and then added the Happy Birthday sentiment from the Level 2 Hostess Set - Something to Celebrate.
The card base is Pink Pirouette and the drawers were made with the Modern Label Punch and then a Rose Red Designer Brad was added.
The teddy bear itself was made of various different circle punches and the Heart to Heart Punch and also the little heart from the Two-Step Owl Punch.
There was lots of daubing done on this card to give it some depth. 


The second card was again using Pink Pirouette as the card base, with a layer of Baja Breeze DSP which I thought kind of gave a sky backdrop.  The leaves were from the Two-Step Bird Punch.  The owl was punched from Crumb Cake card and we added a little ballerina outfit using Pink Pirouette card for the chest and Pink Pirouette DSP punched with one of the Itty Bitty Punch Pack for the skirt.  a little string of Basic Pearls were then added.  The balloons were punched with 1" Circle Punch and I again used the little heart from the Two-Step Owl Punch for the tie on each balloon and this gave me something to tie the Silver Elastic Cord to.  


While I realise a 1 year old might not be able to full appreciate these cards, at lot of work went into them and I know my card class lady, the lovely Joan, was very pleased with the results.


While these weren't the cards I actually designed for class, if you love these and would like to take part in a class and make 5 cards for yourself, then please check out my Saturday Card Class page.
There are details of the theme classes coming up over the next few months and the stamp sets we will be using.  Spaces are limited, so please contact me to book your space.

Wednesday, 7 September 2011

Happy Birthday Mum!

Yesterday it was my lovely mum's birthday, so I took the day off work and we spent it together..........

Whenever September comes around I always see sunflowers in the shops and I think they are simply gorgeous.  I case'd a card by Andrea Gideon to create a sunflower card for my mum.

I really hope it helped to brighten her day :o)


I used the Flower Daises #2 Die with my Big Shot to make the sunflowers, using Peach Parfait and So Saffron card for the petals, and textured Chocolate Chip card for the centres which was run through the Big Shot in the Perfect Polka Dots Embossing Folder.
The leaves are punched in Pear Pizzazz using the Two-Step Bird Punch.
The background is the flower image from Confetti stamp set - inked in Peach Parfait and So Saffron to match the sunflowers.
The card base is Pear Pizzazz layered with textured Chocolate Chip, and embellished with a couple of So Saffron Brads.

The Details: 
Card / Paper - Pear Pizzazz / Chocolate Chip textured / Peach Parfait textured and smooth / Whisper White / So Saffron
Stamps / Ink - Confetti / Peach Parfait / So Saffron
Embellishments - So Saffron Brads
Tools - Flower Daisies # 2 Die / Perfect Polka Dots Embossing Folder / Two-Step Bird Punch / 1" Circle Punch / 1/2" Circle Punch / Dimensionals / Big Shot / 2-Way Glue / Snail / Trimmer / Stampin Scrub and Mist / Paper Piercing Tool and Mat Pack

Thursday, 28 July 2011

Customer Thank You Cards

As you know, I had a couple of workshops last week, so this week I have taken delivery of all the goodies they ordered and have packaged them up for delivery.
I make a thank you card for everyone who orders, but the cards I made for the first bundle of deliveries I forgot to take a picture of - d'oh indeed!!!!

However, I shall be delivering another bundle of orders tomorrow so have made these simple little thank you cards to add to each persons package.


The card base is Pear Pizzazz, with a strip of Sunny Garden DSP added near the top.  I used the Fancy Flower Punch with Peach Parfait card, the 5 Petal Flower Punch with Poppy Parade card, and the flower from the Itty Bitty Shapes Punch Pack with Peach Parfait card also.  The edges of these flowers were sponge daubed in the same colour ink as the card colour, and then they were secured together with a Daffodil Delight Brad in the middle.  I added then to the card front with Dimensionals.
The Sentiment is from the Level 1 Hostess set called Afterthoughts.  It was inked with a Chocolate Chip Marker as I didn't want to use the whole image, just this part of it.


Quick and simple - I hope my lovely customers like them :o)

The Details: 
Card / Paper - Pear Pizzazz / Peach Parfait / Poppy Parade / Sunny Garden DSP
Stamps / Ink - Afterthoughts (Level 1 Hostess) / Chocolate Chip / Poppy Parade / Peach Parfait
Embellishments - Brads
Tools - Sponge Dauber / Mat Pack / Paper Piercing Tool / Tombow / Dimensionals / Trimmer / Stampin Scrub and Mist / 5 Petal Flower Punch / Fancy Flower Punch / Itty Bitty Shapes Punch Pack

Thursday, 23 June 2011

Happy Birthday Rachel!

It's my lovely Niece's birthday today.  I'm really hoping she'll love this card as it was a really tough one.
Obviously I had to make her a card from myself and my other half, but then I also got asked to make cards for Rachel by my mum and also my brother.

This card is what I created for my mum to give to her.  My mum asked if I could do something related to horses!!!!  Well, I'm not one to step away from a challenge.  I do however have to own up - I did not come up with this idea, it's something I got from a blog by a lady called Lynn Pratt.


In all fairness, the actual card didn't take long to make, it was just working out what punches to use for all of the elements.  The snout of the horse (it's probably called something completely different!) was meant to be the Wide Oval Punch, but I don't have that and the smaller oval really wasn't right, so I had to improvise.
I used tracing paper and drew round the Wide Oval Punch in the IB&C, then cut it out and used it to draw round onto the River Rock card.  It's not perfect like if it were punched out, but not half bad I didn't think!

Happy Birthday Rachel - enjoy your day :o)

Check back soon as I'll be doing a punch art piggy card for a friends birthday in August!

The Details: 
Card / Paper - Soft Suede / River Rock / Basic Black / Whisper White
Stamps / Ink - Soft Suede
Embellishments - Black Brads
Tools - White Gel Pen / Circle Punches Galore!!!! / 5 Petal Flower Punch / Sponge Daubers Dimensionals / 2-Way Glue

Friday, 20 May 2011

Beautiful Butterflies

Good Morning!

It's Friday, hoooorrrraayyyyyy............

It's been a rather long week, and I am really looking forward to an evening out with my other half tonight as we've been very busy lately and just not had much "us" time.  This weekend is clear of things to do and places to be so we can spend it together, though I do hope to get a little crafting in!!!  :o)

I made this lovely butterfly card last night after seeing the Pals Paper Arts sketch challenge.
I have to say I am really pleased with my effort on this one, I tried to think outside the box a little and I actually think it's one of my favourite cards so far.  
The colours are Whisper White and Concord Crush, which I just love.  I used the Butterfly Prints stamp set, and stamped two butterflies in Whisper White ink on the Concord Crush card, this was mounted on some flowery DSP, and then I inked the butterfly again and stamped it onto Whisper White in Concord Crush and punched him out with the Butterfly Punch.  I popped on a little Basic Pearl for a body and added it to the card with Dimensionals.  The sentiment is from the Just Believe stamp set and is punched out with the Word Window and popped on the card with two Basic Black Brads.

Let me know what you think, I hope you like it!


The Details: 
Card / Paper - Whisper White textured and smooth / Concord Crush / In Colour DSP (Level 1 Hostess)
Stamps / Ink - Butterfly Prints / Just Believe / Whisper White / Concord Crush
Embellishments - Basic Pearls / Brads
Tools - Word Window Punch / Butterfly Punch / Trimmer / Stampin Scrub and Mist / Snail / Dimensionals / Paper Piercing Tool / Mat Pack