About Me

My photo
I have been a Stampin' Up Demonstrator for almost two years now, and when I signed up it was just for the starter kit and discount on products........ I never imagined it would snowball into being a business like it has. I am a new Mummy to my little boy, Isaac, who is almost four months old now. I am spending my maternity leave enjoying watch him grow up, becoming his own little person, and also trying to build my business up. Stampin' Up! have amazing products and I would love to share my crafting passion with as many people as possible. I am always putting through orders, so if you need anything, or just want some information or advise, please do not hesitate to contact me. If you want to try before you buy, then check out my classes and get booked on.
Showing posts with label Clearly For You. Show all posts

Tuesday, 25 September 2012

Retiring Products Class - card 5

Hello.........

We have come to the last card from the class I rencently ran using retiring products.  

I am planning on a few posts to showcase some of the Autumn/Winter Seasonal Catalogue products over the next week, and maybe even a sneek peak or two at some 12/13 Catalogue products too........
Oh, so much new stuff...........  it's fabulous :o)

Anyway, back to this card, which has a bit of a vintage feel to it.

The card base is Basic Gray and I have teamed it with Concord Crush, one of the retiring In Colours.  The first layer has been embossed with the Vintage Wallpaper Embossing Folder.  

The image withint the Oval Embossed Frame is from Clearly for You.  I love this stamp set and will be sad to see it go.  I really never used it enough, and now it's just too late!


The background image was stamper in Blushing Bride, another retiring In Colour, and the blackberry image (or raspberry's when red!) were inked with markers - Concord Crush and Pear Pizzazz. 

The sentiment is from Oval All (retiring) and we added some punched little flowers with a little pearl in the centre.

Finally, we added a length of Chantilly Crochet Trim.  This is another retiring item, and I have used this a lot over the past year so will really miss it.  Thankfully the Victoria Crochet Trim is sticking around :o)

So, have you seen anything on these class cards that you didn't realise was retiring???  Have you got your orders in for all of those items you have been wanting to purchase over the past year???

If the answer is no, check out the retirement lists on the right hand side of my blog and get an order in quick.  There's only a few days left and so mcuh has already sold out........

Julie x

Julie Halls
Independent Stampin' Up! Demonstrator
07786266722 / 01256 335270

Thursday, 19 January 2012

ILWS – Simply Adorned Insert Swap

Oh wow, I’m really loving the new Simply Adorned product range in the Spring Mini Catalogue.  have you seen what’s on offer????

Chains, bracelets, jewels and charms……………….  all so fabulously gorgeous, and they can be simply altered to suit any outfit!

The charms come in four sizes, all locket style with a hinge that easily allows you to insert customised artwork or photos.

I joined in a swap on In Love With Stamping so I could get lots of lovely inspiration and samples.  I  made 10 of each inserts to fir the larger size charms, 2.5cm x 2.5cm and 3.2cm x 2.5cm.

This first one uses the Charming stamp set, specifically designed with images to fit the inserts.  This insert is for the largest charm.

Simply Adorned Insert Swap Jan 2012 (4)

The first side has the script background inked in Pool Party, then stamped off before stamping onto the Confetti Cream base card.  Over the top I have inked the circle image in Wisteria Wonder and added tiny pearls.  The butterfly image is inked in Perfect Plum and daubed with Champagne Simmer Paint before stamping onto the card.

Simply Adorned Insert Swap Jan 2012 (5)

Flip the card over and on the other side we have the floral image.  I used markers to ink this image so I could get the flowers a different colour from the foliage.  Marker used were Perfect Plum and Pear Pizzazz.  The wording is from You’re a Gem stamp set and is inked in Chocolate Chip.

Simply Adorned Insert Swap Jan 2012

The second insert for the swap is for the square Charm.  I’ve used an old favourite, Clearly For You, and one of the lovely new sets in the Spring Mini, Perfect Postage, an absolute steal at only £8.95 in Clear Mount or £10.95 in Wood Mount – there are four images in the set and there is also a matching Postage Punch.  Once again the base is Confetti Cream card.

Simply Adorned Insert Swap Jan 2012 (1)

The first side I have stamped the Heart image from Perfect Postage in Real read ink.  I them used a sponge dauber to take the colour right to the edges.  The love sentiment is from Tiny Tags and I’ve used Chocolate Chip ink.  My trusty stamp-a-ma-jig allowed me to line this up perfectly, and then I added a Basic Rhinestone.

Simply Adorned Insert Swap Jan 2012 (2)

On the other side I have stamped the background image from Clearly For You in Daffodil Delight.  Like with the other insert I stamped off first to give a lighter shade.  The bird were added over the top in Cherry Cobbler ink.  The top section is a piece of Cherry Cobbler card punched with the wonderful Dotted Scallop Ribbon Border Punch.

 Simply Adorned Insert Swap Jan 2012 (3) 

I cannot wait to get my package of swaps from the others involved.  I will show you what I get over the coming weeks.

These charms really are great value as you can simply change the inserts with every change of outfit and they become completely unique!

Thanks

Julie xxx

Saturday, 10 December 2011

Best Birthday Card Ever!!!!!

Hi everyone,

Just a really quick post today, of a card that wasn't made by me..............

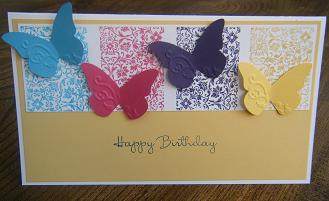
It's my birthday and my other half presented me with my Birthday Card very excitedly..........  he'd raided my craft room, gone through all my piles and drawers of stamps, and made a card for me all himself. 

I was so touched by this, that he'd put such effort in, and the card itself doesn't look like it's a first attempt by someone, it looks great, so I really wanted to share it.


He used the Clearly For You background stamp in Melon Mambo, Tempting Turquoise, Elegant Eggplant and Daffodil Delight, with matching coloured butterflies that I had in a scraps box.


Definitely the best card ever, thank you honey xxxx

Friday, 2 September 2011

August Card Class - Vintage Style

The fourth card at class this month was inspired by a swap I received at a recent training event from Kerry Timms - visit her blog HERE.  I kept the design and changed up the colours.
The base is Rose Red, topped with a layer of Baja Breeze.  This has been distressed using the Cutter Kit, and also stamped with the butterfly from Clearly For You in Whisper White.  Using this ink gives a very delicate background.
Two strips of Very Vanilla have been punched with the Eyelet Border Punch and then screwed up!  Yes, you heard right, I did struggle with this at first as I'm generally a neat freak, with clean edges everywhere!  It was good fun though...........  The Rose Red centre strip was also distressed around the edges and then screwed up into a ball and then flatten back out.
I used the flat stamp and Teabag Stain ink from the Distressing Essentials kit to age the Baja Breeze, Very Vanilla and Rose Red pieces.  This kit is great, with so many tools for distressing, and four different coloured inks to work with as well.
The images from Clearly For You were inked using Markers in Crumb Cake, Rose Red and Baja Breeze, and stamped onto Very Vanilla and cut using the 1 3/8" Circle Punch.  These were also distressed before being added to the card using Dimensionals.


This card was lots of fun to make, using some great techniques.

The Details: 
Card / Paper - Rose Red / Baja Breeze / Very Vanilla
Stamps / Ink - Clearly For You / Rose Red, Baja Breeze, Crumb Cake Markers / Tea Stain / Whisper White
Embellishments - None
Tools - Eyelet Border Punch / Cutter Kit / Distressing Essentials Kit / 1 3/8" Circle Punch / Trimmer / Stampin Scrub and Mist / Dimensionals / Snail

Saturday, 9 July 2011

Saturday Challenge

Happy Saturday - I'm not sure where the week went, or the sunshine!
I don't know about your area, but it's been raining on and off every day this week.
A good excuse to stay indoors and craft :o)

Anyway, just a quick card to show you today that I made based on the Stamping 411 sketch for this week.

I stamped a one sheet wonder ages ago with the Baby Blossoms stamp set, but then never used it.  I thought I could add it in today.  
This stamp set is so cute, and really simple to use.  You can stamp without the Stamp-a-ma-jig, and even if some images aren't lined up properly, it just adds to the springtime vintage feel.  I used a whole host of colours here, So Saffron with More Mustard, Blushing Bride with Rose Red and Pear Pizzazz with Wild Wasabi, then Chocolate Chip for the twigs.


I've layered this onto Rose Red card, with a strip of textured Blushing Bride card and 1/2" Rose Red Seam Binding Ribbon.  The finishing touch is the dotty Four Frames image in Rose Red, with the sentiment from Clearly For You in Chocolate Chip ink.

The Details: 
Card / Paper - Rose Red / Very Vanilla / Blushing Bride textured
Stamps / Ink - Four Frames / Clearly For You / Baby Blossoms / Rose Red / Blushing Bride / Pear Pizzazz / Wild Wasabi / Chocolate Chip / So Saffron / More Mustard
Embellishments - 1/2" Rose Red Seam Binding Ribbon
Tools - Decorative Label Punch / Stamp-a-ma-jig / 2-Way Glue / Dimensionals / Trimmer / Stampin Scrub and Mist

Friday, 1 July 2011

The Colour Coach Blog Hop.................

Hello and Welcome to my blog!

Today is a first for me - my first Blog Hop.........  I'm very excited to be sharing my Colour Coach Combo creations with you and I really hope you like what I have made and it gives you some inspiration.
I have four cards to share with you, based on my chosen colour combo of Tempting Turquoise, Rich Razzleberry and Pumpkin Pie.

Not my first choice of colours, but I struggled with picking so just asked my OH to pick one colour and decided I would go with whatever combination was on the back.  He went with Tempting Turquoise, and either of the two options on the back was going to provide me with a challenge!

Card One

This card is a Clean and Simple (CAS) One Layer card.
I used the Plane and Simple stamp set.  I used my Stamp-a-ma-jig to line up the diamonds and dashes working from the bottom of the card upward.  Finally I added the sentiment half way up the card in Rich Razzleberry.  
The Plane and Simple stamp set is really versatile and this card could be made in any colour combination.
I apologise for the fact I can't take a photograph straight!  :o)

The Details: 
Card / Paper -  Whisper White
Stamps / Ink - Plane and Simple / Tempting Turquoise / Rich Razzleberry / Pumpkin Pie
Embellishments - None
Tools - Stamp-a-ma-jig

Card Two

For this card I started with a Tempting Turquoise card base and stamped the leaf pattern from the Confetti stamp set all over the base in Versamark.  This ink gives a great watermark effect on the card.  It's really subtle.
I then got the Clearly For You stamp set and used the background image, inked in Pumpkin Pie and stamped off the page before stamping onto Whisper White.  This resulted in a faint image, which I then stamped over the top of with the berry image in Rich Razzleberry.
I used the decorative label punch the make a border in Pumpkin Pie for this image and then mounted onto the card base with Dimensionals.  The sentiment from Curly Cute is stamped directly onto the card base in Rich Razzleberry.

The Details: 
Card / Paper - Temping Turquoise / Whisper White / Pumpkin Pie
Stamps / Ink - Clearly for You / Confetti / Curly Cute / Pumpkin Pie / Rich Razzleberry / Versamark
Embellishments - None
Tools - Decorative Label Punch / Stamp-a-ma-jig / Snail / Dimensionals

Card Three


Seeing as the sun was shining when I made these cards, I decided to use the Summer Splash stamp set.  I inked the surf boards image using the Markers so I could vary the colours.  I stamped the image across the piece of Whisper White.  I mounted this onto some Tempting Turquoise DSP and using my Scallop Border Punch I made some Ric-Rac from Tempting Turquoise card.  I thought this looked a bit like waves, so used it to border the surf boards image.  
I glues this onto a Pumpkin pie card base, near the top, so I could add the fish at the bottom, stamped in Pumpkin Pie.  
The sentiment, stamped in Rich Razzleberry, is again from the Plane and Simple stamp set.

The Details: 
Card / Paper - Pumpkin Pie / Whisper White / Tempting Turquoise card and DSP
Stamps / Ink - Summer Splash / Plane and Simple / Tempting Turquoise / Rich Razzleberry / Pumpkin Pie
Embellishments -  None
Tools - Scallop Border Punch / Stamp-a-ma-jig / 2-Way Glue / Snail

Card Four


This last card is my favourite of the bunch.
The card base is Rich Razzleberry with a layer of Tempting Turquoise and then Pumpkin pie DSP.  I used the a la carte stamp All a Flutter, inked with markers and stamped over a square of Whisper White.  I don't think you can really see from the picture, but the central image was stamped over in Versamark and embossed with Clear Embossing Powder.
I added 5/8" Pumpkin pie Satin Ribbon.  The sentiment is from Oval All stamp set, inked using markers and stamped onto Whisper White.  I punched it out with the 1 3/4" x 7/8"Oval Punch and mounted it on Scallop Oval Punched Rich Razzleberry.  I used the Paper Piercing Tool and Mat Pack to pierce each scallop.  This was added to the card with Dimensionals.


The Details: 
Card / Paper -  Rich Razzleberry / Tempting Turquoise / Whisper White / Pumpkin Pie DSP
Stamps / Ink - Oval All / All a Flutter / Versamark / Tempting Turquoise / Rich Razzleberry / Pumpkin Pie
Embellishments - 5/8" Pumpkin Pie Satin Ribbon
Tools - Paper Piercing Tool / Mat Pack / Dimensionals / Snail / Scallop Oval Punch / 1 3/4" x 7/8" Oval Punch / Clear Embossing Powder


And here are all the cards together


Thanks so much for stopping by.
From me you can hop along to Alison P

Here is a full list of all of the blog hop stops from Group 1 and also Group 2.
Try and check out every one as there are many wonderful creations.  Please leave a comment or two along the way as we all love to know what you think :o)

Group 1
1. Scrappydiva http://stampin-divas.blogspot.com/
2. The Crafty Bug http://the-crafty-bug.blogspot.com/
3. AlisonP http://www.craftyalisoninlyon.blogspot.com/
4. Daisydaye http://www.emma-daye.blogspot.com/
5. Frankiesue http://www.frankiesue.blogspot.com/
6. Glitter mum http://www.mygroovystampinup.blogspot.com/
7. Sarah-Jane http://www.cardsandacuppa.blogspot.com/
8.Cheshire Design http://www.cheshiredesignhouse.blogspot.com/
9. Linzim http://lindseyscards.blogspot.com/
10. Valmoody http://stampingwithval.wordpress.com/
11. Cupake http://pinkycardsandcreations.blogspot.com/
12. Laura http://airingcupboardstamping.blogspot.com/

13. Emily http://stampinmermaid.blogspot.com/
14. Teri http://teriscraftspot.blogspot.com/
15. Sara http://sarastamper.blogspot.com/
16. Sarah http://www.stampinsarahiow.blogspot.com/
17. Claire http://stampinupscrapper.blogspot.com/
18. Elaine http://www.thesassystampers.blogspot.com/
19. Donna http://www.head-over-heels-by-dlm.blogspot.com

20. Erika http://twintroublescreations.blogspot.com/
21. Karin http://www.teacupdesigns.com/
22. Vicky http://www.vickylouscorner.blogspot.com/
23. Jan http://jan-crippin.blogspot.com/

If you have enjoyed viewing my blog then why not add yourself as a follower so you will be updated whenever I post something new :o)

Saturday, 4 June 2011

Stamping 411 - two challenges in one day - it's the weekend!

I've been busy card crafting this afternoon while my lovely other half re-felts the shed roof in the scorching sunshine!  I'm sure there will be a sun burnt head later on, glowing away!!!!

I took myself to my craft room and decided to have a go at a couple of Saturday Challenges.
The first was the monochrome colour challenge, and this is a sketch challenge from Stamping 411

I went for a completely different look and feel with this card, turning to the Springtime Vintage DSP and Four Frames stamp set, with a little Baby Blossoms stamp thrown in for good measure :o)


I went with a neutral base of Crumb Cake and added the strip of DSP outlined by Pear Pizzazz card, one side of which was punched with the Eyelet Border.  The frame was stamped in Basic Gray with the sentiment added from Clearly For You.  I used Aqua Painters with Rose Red and pear Pizzazz to colour this.  The Baby Blossoms down the right hand side of the card are just stamped in Versamark ink to contrast against the Crumb Cake.  I added a frame to the sentiment in Rose Red and popped it onto the card with Dimensionals.


I think two posts today should make up for my lack of posts since Wednesday.  My inspiration seemed to get up and go for a few days!  I can guarantee that there will be more posts for the next few days though :o)


Right, off to sort myself out before I head off to babysit my nephew this evening.  He'll probably be sleeping, the little darling......  he's such a cutie!


The Details: 
Card / Paper - Crumb Cake / Very Vanilla / Rose Red / Pear Pizzazz / Springtime Vintage DSP
Stamps / Ink - Four Frames / Baby Blossoms / Clearly For You / Basic Gray / Versamark / Pear Pizzazz / Rose Red
Embellishments - None
Tools - Decorative Label Punch / Eyelet Border Punch / Aqua Painter / Snail / Dimensionals / Trimmer / Stampin Scrub and Mist

Monday, 23 May 2011

My Favourite Stamp Set - today anyway!

Hi there,

It seems at the moment that I keep on going back to the Clearly For You stamp set, and today is no exception!
I think it works really well with the Four Frames and co-ordinating Decorative Label Punch.
Of course, everything Stampin' Up! co-ordinates.............  

This is a card I've made for some friends for their anniversary, but I'm also linking it in for the Stamping 411 sketch challenge this week.


I picked out some of the colours in the Botanical Gazette DSP, so used So Saffron as the card base, and this lovely bird from the DSP seemed to work well with the birds in the Clearly For You stamp set.  I ran it through the Lattice Square Embossing Folder.  Textured Marina Mist card forms the top section, with some lovely Early Espresso ribbon, and then one of the Four Frames inked in So Saffron, with Early Espresso birds and sentiment.  I used a marker pen to ink the birds as I only wanted two of the three on the card.  Markers make this sort of selective stamping so easy.
The frame is popped onto the card using Dimensionals, and for some added embellishment I added some Basic Pearls.

The Details: 
Card / Paper - So Saffron / Marina Mist / Very Vanilla / Early Espresso / Botanical Gazette
Stamps / Ink -Clearly For You / Four Frames / So Saffron / Early Espresso
Embellishments - 1/4" Early Espresso Grosgrain Ribbon / Basic Pearls
Tools - Decorative Label Punch / Square Lattice Embossing Folder / Snail / Dimensionals / Trimmer / Stamp-a-ma-jig / Stampin Scrub and Mist

Saturday, 21 May 2011

The Never Ending Card!

Hi,

Finally it's the weekend!  I have been waiting all week to try out this card, but wanted to wait until I had some time and wouldn't rush it!  I have to admit, it did take me a long time to do, but it is my first attempt :o)
It would make a good card for a special person or occasion.  I got the instructions from a video by Dawn Griffith.

The Never Ending Card is a card created of four pieces, they are scored and folded before being stuck together in such a way that you can fold the card back on itself over and over and over........  you get the idea!
My other half was not convinced it would work, so was suitable impressed when I made a mock up with paper.  This helped me get the dimensions for the bits I added to decorate the card and I could scribble and put measurements all over the mock up.

So here it is - four photos to show you each of the views when folding the card back on itself:


Seeing as I used the Botanical Gazette DSP for this card, it features lots of birds, plus the ones on the last fold from Clearly For You stamp set.  For that reason I decided to link my card for the Stampin' Royalty challenge this week, which is all about Birds!

The Details: 
Card / Paper - Early Espresso / Cherry Cobbler / Very Vanilla / Not Quite Navy / Botanical Gazette DSP
Stamps / Ink - Something to Celebrate (Level 2 hostess) / Clearly For You / Not Quite Navy / Cherry Cobbler / Old Olive
Embellishments - None
Tools - / Square Lattice Embossing Folder / 1 3/8" Circle Punch / 1 3/4" Scallop Circle Punch / 1" Circle Punch / Circle Punch from Itty Bitty Shapes

Monday, 9 May 2011

It's Mojo Monday!

Hello......

The weekend just zipped on by, and it's Monday again.  Not such a bad day, the sun was out, work was busy and went pretty quick, and I came home to do a spot of card making.

This weeks Mojo Monday challenge was a fun sketch.

I decided to use the Colour Coach to select my colours as I have been sticking with Brights and the In Colours of late.  The Colour Coach is a fab tool, it makes creating cards with matching colours really simple.  You pick a colour swatch from the pack, and on the back it give you it's monotone colour, plus two colour combinations.  I went for Old Olive as my main colour and teamed it up with Pretty in Pink and Night of Navy.  These are not colours I would have thought to put together myself.

Here's the card I came up with.


I used the little background stamp in Clearly For You to make my own DSP.  I used the Whisper White ink on the Night of Navy card. The sentiment also comes from the Clearly For You stamp set and was cut out using the Word Window punch and popped on the card with a dimensional.  The Whisper White card on the top section was run through the Perfect Polka Dots embossing folder to match the polka dot pattern on the Four Frames stamp that I inked in Pretty in Pink.  I finished the card off with a strip of Old Olive ribbon and a Pretty in Pink button.

The Details: 
Card / Paper - Old Olive / Night of Navy / Whisper White
Stamps / Ink - Clearly For You / Four Frames / Whisper White / Pretty in Pink / Night of Navy
Embellishments - 1/4 inch Grosgrain Old Olive Ribbon / Pretty in Pink Designer Button
Tools - Word Window Punch / Perfect Polka Dots Embossing Folder / Decorative Label Punch / Colour Coach / Bone Folder / Trimmer / Stampin Scrub & Mist / Stamp-a-ma-jig / Dimensionals / Snail