About Me

My photo
I have been a Stampin' Up Demonstrator for almost two years now, and when I signed up it was just for the starter kit and discount on products........ I never imagined it would snowball into being a business like it has. I am a new Mummy to my little boy, Isaac, who is almost four months old now. I am spending my maternity leave enjoying watch him grow up, becoming his own little person, and also trying to build my business up. Stampin' Up! have amazing products and I would love to share my crafting passion with as many people as possible. I am always putting through orders, so if you need anything, or just want some information or advise, please do not hesitate to contact me. If you want to try before you buy, then check out my classes and get booked on.
Showing posts with label Eyelet Border Punch. Show all posts

Friday, 2 September 2011

August Card Class - Vintage Style

The fourth card at class this month was inspired by a swap I received at a recent training event from Kerry Timms - visit her blog HERE.  I kept the design and changed up the colours.
The base is Rose Red, topped with a layer of Baja Breeze.  This has been distressed using the Cutter Kit, and also stamped with the butterfly from Clearly For You in Whisper White.  Using this ink gives a very delicate background.
Two strips of Very Vanilla have been punched with the Eyelet Border Punch and then screwed up!  Yes, you heard right, I did struggle with this at first as I'm generally a neat freak, with clean edges everywhere!  It was good fun though...........  The Rose Red centre strip was also distressed around the edges and then screwed up into a ball and then flatten back out.
I used the flat stamp and Teabag Stain ink from the Distressing Essentials kit to age the Baja Breeze, Very Vanilla and Rose Red pieces.  This kit is great, with so many tools for distressing, and four different coloured inks to work with as well.
The images from Clearly For You were inked using Markers in Crumb Cake, Rose Red and Baja Breeze, and stamped onto Very Vanilla and cut using the 1 3/8" Circle Punch.  These were also distressed before being added to the card using Dimensionals.


This card was lots of fun to make, using some great techniques.

The Details: 
Card / Paper - Rose Red / Baja Breeze / Very Vanilla
Stamps / Ink - Clearly For You / Rose Red, Baja Breeze, Crumb Cake Markers / Tea Stain / Whisper White
Embellishments - None
Tools - Eyelet Border Punch / Cutter Kit / Distressing Essentials Kit / 1 3/8" Circle Punch / Trimmer / Stampin Scrub and Mist / Dimensionals / Snail

Tuesday, 2 August 2011

Colour Combo Card

Oh my goodness, I can't believe it's Tuesday already!  I was just about to write Monday and realised that had already passed.............  it's really true that time goes faster as you get older!

Today I have a card to show you that I made for the Colour Q Challenge

Lucky Limeade is a new In Colour from Stampin' Up! that they USA had in their new catalogue.  It's yet to arrive in the UK, so I substituted with Old Olive which is similar but slightly darker.


I used Basic Gray for the card base.  The second layer is Textured Whisper White which I have embossed using the Big Shot and Vintage Wallpaper Embossing Folder.  Before putting the card into the embossing folder I used a Brayer to add Bashful Blue ink to show on the debossed side.
This has been mounted with edges in Tempting Turquoise punched with the Eyelet Border Punch.
The sentiment is from So Happy For You (Retired SAB) inked in Tempting Turquoise and stamped into the Four Frames image already stamped in Old Olive ink.  This was cut out with the Decorative Label Punch and edged in Tempting Turquoise card.  I popped it onto the center of the card with Dimensionals, and added two Old Olive Designer Buttons to the embossed background.


I kind of feel like there's something missing - it's not quite right!  Maybe I'll have another go tomorrow :o)

The Details: 
Card / Paper - Basic Gray / Tempting Turquoise / Whisper White Textured and Smooth
Stamps / Ink - Bashful Blue / Old Olive / Tempting Turquoise / Four Frames / So Happy For You (Retired SAB)
Embellishments -  Designer Buttons
Tools - Decorative Label Punch / Vintage Wallpaper Embossing Folder / Eyelet Border Punch / Dimensionals / Snail / Tombow / Glue Dots / Trimmer / Stampin Scrub and Mist

Monday, 13 June 2011

Mojo Monday - on a Monday!

Whooo hoooo........  I actually found time to craft tonight and get my Mojo Monday card done on Monday!

I found it quite a tough one for some reason this week.  I'm not 100% convinced I even like the card, but you have to try new things and learn along the way :o)

You can view the sketch for this week here

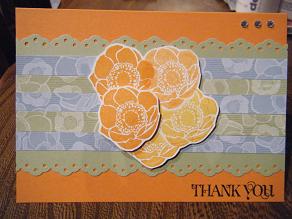
I went with the Greenhouse Gala DSP and took the colours Pumpkin Pie, Daffodil Delight, Pear Pizzazz and Baja Breeze from the DSP.
I used strips of the small flower print to lay across the card base, edged with Pear Pizzazz card punched with the Eyelet Border.  I then gave masking a go with one of the stamps from the Ornate Flowers set.  I stamped the images in a circular pattern and cut them out.  I also cut out a singular flower and mounted both of these elements onto the card with dimensionals to give some interest to the card.  The sentiment is in Basic Black from the Curly Cute stamp set.  For a little extra touch I added the three Basic Rhinestones in the top right as suggested in the sketch.


Viola.......... does it work?  Let me know what you think!

The Details:
Card / Paper - Pumpkin Pie / Pear Pizzazz / Whisper White / Greenhouse Gala DSP
Stamps / Ink - Ornate Flowers / Curly Cute / Pumpkin Pie / Daffodil Delight / Basic Black
Embellishments - Basic Rhinestones
Tools - Eyelet Border Punch / Trimmer / Paper Snips / Dimensionals / 2-way Glue / Stampin Scrub and Mist

Friday, 10 June 2011

Just Add Black and White

Black and White is the colour theme for the Just Add Ink challenge this week.
Very simple and elegant, which is how I wanted my card to look. 
I think I have achieved that, though without my stamp-a-ma-jig I think it wouldn't have turned out so well!
Those little Cute by the Inch stamps are exactly as the name suggests, CUTE!


Swing by the Just Add Ink site and check out every ones entries.  It's a great way to find inspiration......

The Details:
Card / Paper - Basic Black / Whisper White
Stamps / Ink - Curly Cute / Cute by the Inch (Level 1 Hostess) / Basic Black / Whisper White
Embellishments - None
Tools - Stamp-a-ma-jig / Eyelet Border Punch / Trimmer / Stampin Scrub and Mist

Saturday, 4 June 2011

Stamping 411 - two challenges in one day - it's the weekend!

I've been busy card crafting this afternoon while my lovely other half re-felts the shed roof in the scorching sunshine!  I'm sure there will be a sun burnt head later on, glowing away!!!!

I took myself to my craft room and decided to have a go at a couple of Saturday Challenges.
The first was the monochrome colour challenge, and this is a sketch challenge from Stamping 411

I went for a completely different look and feel with this card, turning to the Springtime Vintage DSP and Four Frames stamp set, with a little Baby Blossoms stamp thrown in for good measure :o)


I went with a neutral base of Crumb Cake and added the strip of DSP outlined by Pear Pizzazz card, one side of which was punched with the Eyelet Border.  The frame was stamped in Basic Gray with the sentiment added from Clearly For You.  I used Aqua Painters with Rose Red and pear Pizzazz to colour this.  The Baby Blossoms down the right hand side of the card are just stamped in Versamark ink to contrast against the Crumb Cake.  I added a frame to the sentiment in Rose Red and popped it onto the card with Dimensionals.


I think two posts today should make up for my lack of posts since Wednesday.  My inspiration seemed to get up and go for a few days!  I can guarantee that there will be more posts for the next few days though :o)


Right, off to sort myself out before I head off to babysit my nephew this evening.  He'll probably be sleeping, the little darling......  he's such a cutie!


The Details: 
Card / Paper - Crumb Cake / Very Vanilla / Rose Red / Pear Pizzazz / Springtime Vintage DSP
Stamps / Ink - Four Frames / Baby Blossoms / Clearly For You / Basic Gray / Versamark / Pear Pizzazz / Rose Red
Embellishments - None
Tools - Decorative Label Punch / Eyelet Border Punch / Aqua Painter / Snail / Dimensionals / Trimmer / Stampin Scrub and Mist

Sunday, 29 May 2011

Mini Handbags............

Hello!

Sunday again, but at least this week we have a Bank Holiday Monday thrown in as well, so one more day off of work which is lovely.
It didn't rain yesterday which was great, though it was still a bit too breezy to sit and have the bbq outside, so the boys cooked it outside and then bought it in for a picnic indoors.  It was a lovely day.  My nephew, Ethan, was on top form as usual, all smiles and lots of gurgles going on.  He's so, so close to turning him self from his back onto his front, if only he could figure out moving his arm from under him, he'd be there!  
My brother's lovely girlfriend Alex gave me a little list of people and occasions she needed card for, so as soon as I got home I got to work!

I made a girlie card based on the Stamping 411 sketch challenge this week.
I went for bright and bold colours of Melon Mambo and Tempting Turquoise, thrown in with some Whisper White and Basic Black.
Now I do have to confess that I used a Stampin' Up! product that isn't available in the UK!  In Canada they have a set of stamps called Create a Cupcake, and a co-ordinating punch.  I was lucky enough to be able to get one of these, and have resisted using it on my blog so far, but for this card I do have an alternative.

The cute little handbags are made by punching out a cupcake base, or wrapper I guess, and turning it upside down, but if you have the Scallop Square Punch, you can use that and just trim the sides at an angle to create the main body of the handbag.
The top of the handbag is made using the 1" Circle Punch and folding it over the bottom section, then use the same punch to create the handle.  A Basic Rhinestone is added for a bit of girlie bling, and there you have a mini handbag!


A girl can never have too many handbag, right????

The Details: 
Card / Paper - Basic Black Textured / Temping Turquoise Smooth and DSP / Melon Mambo Smooth / Whisper White Smooth
Stamps / Ink - Something to Celebrate (Level 2 Hostess) / Melon Mambo
Embellishments - Basic Rhinestones / 5/8" Whisper White Satin Ribbon
Tools - Build a Cupcake Punch (alternative Scallop Square Punch) / 1" Circle Punch / Eyelet Border Punch / Trimmer / Dimensionals / Sticky Strip / 2-way Glue Pen / Stampin Scrub and Mist / Stamp-a-ma-jig

Thursday, 26 May 2011

Double Challenge Day - take two..........

I really liked the Sweet Sunday Sketch Challenge this week, but am a bit late getting started on it.  Having looked at some of the challenges throughout the rest of this week, I thought I'd link the Sweet Sunday sketch in with The Color Dare this week.  The colours are ones I would never have thought to put together - So Saffron, Concord Crush and a Neutral!

I grabbed my stack of In Colour DSP and my Trendy Trees stamp set for this one and thought I'd make a lovely Thinking of You card.


I used the trusty Stamp-a-ma-jig to get my trees trunks and the leafy tops all lined up, and decided the put the more standout Concord Crush colour in the middle, but to make it a bit more interesting I stamped it twice and cut one out with the 1" Circle Punch and popped it on top with a dimensional.  I thought it gave a nice bit of dimension to the card.  I used the Eyelet Border Punch along the bottom, and added in some Crumb Cake textured card for mounting.

I wasn't too sure these colours would really work together, but I think they look great!

The Details: 
Card / Paper - Concord Crush smooth and DSP / So Saffron DSP / Very Vanilla / Crumb Cake textured
Stamps / Ink - Trendy Trees / Crumb Cake / So Saffron / Concord Crush
Embellishments - None
Tools - Eyelet Border Punch / 1" Circle Punch / Stamp-a-ma-jig / Trimmer / Snail / Dimensionals / Stampin Scrub and Mist

Tuesday, 24 May 2011

Midweek Mojo - Just Believe

Hey,

Middle of the week already - I hope you are all having a good one?!?!?

Mojo Monday has come a little late this week - well the post is, I did actually make this card Monday night.

Well, based on the lovely Mojo sketch this week, here is the card I created using the gorgeous Just Believe stamp set.


This set is just so lovely.  I inked the images using the marker pens so I could get a variety of colours and create a proper picture, rather thank just one solid image.  It looks so different to the card I made last week using the big image from this set that I embossed in white.  You could use so many different colours on the flowers to really change this card for a variety of occasions.

Let me know what you think as I love reading all of your comments? 

Have a lovely Wednesday
Julie x

The Details: 
Card / Paper - Daffodil Delight / Early Espresso / Very Vanilla / Old Olive DSP
Stamps / Ink - Just Believe / Markers - Daffodil Delight / Old Olive / Cherry Cobbler
Embellishments - 1/8" Daffodil Delight Taffeta Ribbon
Tools - Eyelet Border Punch / Sticky Strip / Snail / Trimmer / Paper Snips / Dimensionals / Stampin Scrub and Mist / Colour Coach

Thursday, 19 May 2011

Congratulations Jenny and Richard!!!

Oh how wonderful - my friends Jenny and Richard are expecting a baby.
They are the couple who I made the penguin card for when it was their anniversary last week.  Well on the same day as their anniversary, they had their 12 week scan and were told everything is looking just fine.
Now I made this card at the weekend, but they know I blog, so I've waited a few days to put this post up so the card has time to reach them.

I used the Stamping 411 Sketch as a template for my design, and quite appropriately used the Nursery Suite DSP along with the prams image from the Queue Up stamp set.  This is now retired, boo hoo!!!


I hope they like it, and I wish Jenny and Richard a wonderful pregnancy!

The Details: 
Card / Paper - Nursery Suite DSP / Chocolate Chip Textured Card / Pear Pizzazz Card / Regal Rose Card
Stamps / Ink - Queue Up (retired level 3 hostess set) / So Happy For You (retired SAB set) / Basic Black / Baja Breeze / So Saffron / Regal Rose / Pear Pizzazz
Embellishments - Pear Pizzazz 1/2" Seam Binding Ribbon
Tools - Eyelet Border Punch / Stamp-a-ma-jig / Snail / Sticky Strip / Stampin Scrub and Mist / Trimmer

Monday, 16 May 2011

Strength and Hope

Here are some more cards made using the Strength & Hope stamp set at the weekend.

The top of the Stampin' Up! family tree I am part of is Natalie O'Shea and she got inspiration for the following cards from a lady called Heather Summers.
There were five cards in the set to make, though I only made two of them on Saturday and bought the bits home to do the rest.  We had a fun packed day with so many bits and pieces to make, it was a busy training session.


The set of cards Natalie put together all used Rose Red, Crumb Cake, Pear Pizzazz and Very Vanilla which worked really well together.There were lots of butterflies to cut out and we used the Pear Pizzazz 1/2" Seam Binding Ribbon on all of the designs too. 

I have one final 3D item that we made at training to show you, but I will save that for tomorrow.

Thanks xx

The Details: 
Card / Paper - Crumb Cake card / Rose Red card / Very Vanilla card / Pizzazz card and DSP  
Stamps / Ink - Strength & Hope / Early Espresso / Rose Red / Pear Pizzazz / Crumb Cake
Embellishments - Pear Pizzazz 1/2" Seam Binding Ribbon / Basic Pearls
Tools - Scallop Trim Border Punch / Eyelet Border Punch / BoHo Blossoms Punch / Circles # 2 Die / Snail / Trimmer / Stampin Scrub and Mist / Dimensionals

Friday, 13 May 2011

Finally I can blog!

Finally I can blog! Hurray.........

I've been trying to get on and post a blog since yesterday evening, without any success, but whatever the problem was it appears to be sorted out now.

So Wednesday, my crafty day.  Well it didn't go quite as planned as unfortunately my lovely dad was taken ill.  He's in the hospital, but doing OK, and it's just a case of the consultants figuring out what's going on.  So with visiting and then trying to pick my car up, and being back at work, it's been a busy few days. 
I wanted to get a post in yesterday, but was lacking inspiration so checked to see what challenges were about.

Pals Paper Arts Challenge this week was to create anything for a wedding - a card, an invitation, a place card, or perhaps a favor.

I'd been looking on Split Coast Stampers website as I have been wanting to make a box to hold note cards, so I used one of the tutorials to come up with this box which is to hold 3" x 3" note cards but could be used for favours, though maybe made a bit smaller. 


Not the greatest photograph, sorry about that!
I used the In Colour DSP in Blushing Bride as it seemed appropriate for the challenge.  I also tried out my Daisy Die and layered the cut-outs in various colours, I had run the card through the polka dot embossing folder first which added a nice texture to the flowers.

Right, tomorrow I am off to my first team training session, so I hope to have lots of lovely things to show you when I get back.  I'm really looking forward to meeting some of the other Stampin Stars and getting some inspiration.  I haven't yet finished my swaps to take with me, so I'd best get on with that  xxx

The Details: 
Card / Paper - Chocolate Chip Textured Card / Very Vanilla Card / Blushing Bride Card and DSP
Stamps / Ink - None
Embellishments - DS Button
Tools - Trimmer / Eyelet Border Punch / Perfect Polka Dots Embossing Folder / Flower Daisies # 2 Die / Sticky Strip / Glue Dots

Saturday, 7 May 2011

Crafty Bug Mum.....

Oh, it's the weekend! Hoorrrraaayyyyyy..............

I had a lovely crafty morning round at my mums house today.  I limited myself to one box of goodies to haul over there, and decided to let mum take the reigns as to what she wanted to do.  I gave her some ideas and we got started.  My mum is a newbie to card craft, so she took her time getting to grips with the items, particularly the punches, but she mastered two-step stamping really well.  I was really pleased with what she created.

So here are the two cards my mum made today.


This first one was made using the Build A Blossom stamp set and Blossom Petals Punch in the mini catalogue.  There is so much you can do with these items, they are brilliant.  We stuck with mostly the In Colours, as they happened to be the ink pads I took with me.  We used the Designer Buttons to pop in the centre of the flower and alongside the sentiment.  The buttons looks so much nicer in real life than in the catalogue, it doesn't do them justice.  I love the way the Poppy Parade really stands out against the Basic Black textured card.


Now I think this card is a beauty.  Well done my mum xxx

Again we went with the In Colour palette.  The main three colours we used were Poppy Parade, Peach Parfait and Pear Pizzazz.  All three are colours from the Sunny Garden DSP.  We punched out sections with the large square punch and layered up with the scallop square extra-large punch.  The sentiment is from Something to Celebrate (level 2 hostess), on whisper white, punched with the large oval punch and mounted on Peach Parfait with the scallop oval extra-large punch.  The beautiful butterflies are in Poppy Parade, and made using the Beautiful Wings Embosslit Die.  

I think a big well done is deserved by my mum :o)

She's coming along with me to team training next weekend, so hopefully she now feels more prepared and is more familiar with the products.

Right, quick change, and time to head off.  I'm finally getting to give the Penguin Celebrate card to my friends for their anniversary tonight.  I really hope they like it xx

The Details: 

Card / Paper - Sunny Garden DSP / Poppy Parade / Whisper White / Pear Pizzazz / Basic Black / Peach Parfait
Stamps / Ink - Something to Celebrate /Pear Pizzazz / Poppy Parade / Build a Blossom
Embellishments - Designer Buttons
Tools - Beautiful Wings Embosslit Die / Mat Pack and Paper Piercing tool / Trimmer / Stampin Scrub & Mist / Clear Block C / Blossom Petals Punch / Scallop Oval Ex-Lrg / Oval Large / Scallop Square Ex-Lrg / Square Large / Eyelet Border punch

Thursday, 5 May 2011

More Butterflies - PPA92 Celebrity Color Challenge

Two posts in one day - I'm addicted!

I thought I'd take part in another challenge today - this time it's a Pals Paper Arts Colour Challenge!

This weeks challenge is all about working with the wonderful spring palette of Pear Pizzazz, Peach Parfait and Poppy Parade.

I decided to use a couple of products I've not played with before - the Eyelet Border punch and the All a Flutter a la carte stamp (one of the great single stamps you can buy from the main catalogue - inside the back page)


I've stamped the butterfly onto whisper white card in peach parfait, though I thought it would be nice to have one stand out a little more, so I inked it in peach and then coloured the body and wing edges with the poppy parade marker before stamping onto the centre of the card.  The card base is poppy parade also, and I've added in pear pizzazz by way of a border punched from the DSP Pack - In Colour which is a level 1 hostess product.

Summer is on the way, and so are the butterflies :o)

The Details: 
Card / Paper - Poppy Parade / Whisper White / DSP Pack - In Colour Pear Pizzazz
Stamps / Ink - All a Flutter / Peach Parfait / Poppy Parade marker
Embellishments - None 
Tools - Eyelet Border Punch / Two-way Glue / Stampin Scrub & Mist / Trimmer