About Me

My photo
I have been a Stampin' Up Demonstrator for almost two years now, and when I signed up it was just for the starter kit and discount on products........ I never imagined it would snowball into being a business like it has. I am a new Mummy to my little boy, Isaac, who is almost four months old now. I am spending my maternity leave enjoying watch him grow up, becoming his own little person, and also trying to build my business up. Stampin' Up! have amazing products and I would love to share my crafting passion with as many people as possible. I am always putting through orders, so if you need anything, or just want some information or advise, please do not hesitate to contact me. If you want to try before you buy, then check out my classes and get booked on.

Wednesday, 30 November 2011

Quick Christmas Cards

Well, another day, another Christmas themed post!!!!

It is pretty much December, so Christmas is upon us in a big way.
I have three more craft fairs to attend, details will be on my blog later today, and then I will be busy making my own Christmas cards to send and wrapping presents, and preparing for having everyone over to my place for Christmas Day.  It's the first time ever, so I'm very excited!!!!

Back to the cards today though!

This first one is a 4 inch square card, stamped with the tree image from Contempo Christmas.  I love this set so much and have had great fun using it these past few weeks.
I used markers to ink the image so that I could get the different colours together.  Christmas classics, Old Olive and Cherry Cobbler, along with a little Daffodil Delight for the star.
The DSP I have used to layer it are retired Jolly Holiday papers from last years catalogue.  I'm trying to use up all of my old stash.
I do think this would also look fab with the Holly Berry Bouquet DSP, and just change the colours for Real Red and Wild Wasabi, two of my favourites together :o)

This second card is one for the kids, with the fun little images from Every Little Bit.  This is a brilliant stamp set with 28 different images covering all sorts of themes.
I've picked out the Christmasy ones to use here.  All of them were inked with markers, again this allowed me to mix my colours which was especially useful with the penguin.  I didn't want any of that Basic Black getting into my Pumpkin Pie beak and feet!!!

I punch the images out with the 1 1/4" Square Punch and Layered them onto Scallop Punch pieces of Poppy Parade and Island Indigo. 

The middle image was popped up on Dimensionals.
The backing DSP is from the 11/12 In Color Paper Stack in Pool Party, as is the Scallop Oval for the sentiment.  The sentiment is from Petite Pairs, again a stamp set that covers all occasions.


I hope you like my offerings today.  I really had fun making two such different cards, and hopefully a few of them will sell at the weekend :o)

The Details: 
Card / Paper - Poppy Parade / Old Olive / Jolly Holiday DSP (retired) / Pool Party DSP (In Color Stack) / Island Indigo / Pool Party / Whisper White / Very Vanilla
Stamps / Ink - Contempo Christmas / Old Olive / Cherry Cobbler / Daffodil Delight / Poppy Parade / Basic Black / Pumpkin Pie / Island Indigo / Every Little Bit / Petite Pairs
Embellishments - None
Tools - Scallop Border Punch / 1 1/4" Square Punch / Scallop Square Punch / Scallop Oval Punch / Large Oval Punch / Trimmer / Stampin Scrub and Mist / Dimensionals

Sunday, 27 November 2011

Craft Fair - Punch Art Fun

I'm sure that is has not escaped any ones attention that Christmas is fast approaching.  I have already made mention in a few posts that I have been making lots of items to sell at some craft fairs I am attending.  Well, this is where the show and tell really begins.  Over the next few weeks I will be sharing with you lots of lovely Christmas gift items that I have spent many a late night putting together.  
At this point I have done one Christmas fair, but it was on a remarkably hot November day, and attendance at the fair was not what the organisers had hoped.  Needless to say, I don't have to rush around making loads for the next fair in just over a weeks time as I have lots of stuff left.  
My theory is that since the next two are actually in December, then people will be more in the Christmas frame of mind........  The other two fairs are also on a slightly bigger scale, so my fingers are crossed for good turnouts.

Today I wanted to show you some punch art lolly pop bookmarks that I have made for children.  Although not a Stampin' Up! product, I have added wiggly eyes which I think makes them super cute :o)

Here is my little troupe of penguins.
The body is made with Basic Black card and the Extra Large Oval Punch, then with Whisper White and the Large Oval Punch I added a chest area.  The wings are made with the large Oval as well, and a 1" Circle Punch for the head.  The beak is a Pumpkin Pie heart punched from the Owl Builder Punch and the feet come from that punch also.


Next up are my Santa's..........  Punches can be used for so many things, it's just a case of a little imagination!

Santa's hat is 1 1/4 Square Punch of Real Red cut in half and trimmed with a Whisper White piece of card punched with the Word Window Punch.  The Itty Bitty Shapes Punch Pack was used for the hat bobble and also the beard pieces.
The face is a 1 3/8" Circle of Pink Pirouette and the nose a smaller circle again using the Itty Bitty Shapes Punch Pack.


I have a few other punch art items to share with you, so check back over the coming days, or sign up to follow me or for email alerts.

Happy Crafting
Julie xxx

Friday, 25 November 2011

Christmas Card Class and Craft Fair Makes

Hello everyone - I want to share a couple of the cards from my recent Christmas class.
Everyone made 10 cards and 10 gift tags, but in my haste at preparing for convention I didn't take pictures of everything!  I seem to be doing this a lot lately............

However, a couple of the cards I made extras to sell at a craft fair I am doing, as well as making up 20 packs of gift tags, so these items I can share with you, though you will have to excuse the cello wrapper which doesn't make for the best picture ever!

All of the cards used the Welcome Christmas stamp set and the Tags til Christmas made the gift tags a really quick make.

This first card has the effect of looking into a house where the family are decorating a tree.  It is not an original idea by me, but I have seen lots of variation on the Internet and this is just my take on it.
The main image was stamped onto Very Vanilla card, then the wreath image was added along the top before the card was cut into four pieces.  These were mounted onto Early Espresso, and the other layer is Crumb Cake and then Always Artichoke for the card base.
The sentiment was stamped in Cherry Cobbler and then cut by hand, a little fiddly but not too time consuming.  It really makes you appreciate the ease of using punches when you have to cut something like this by hand though :o)
The bow at the top was made using Cherry Cobbler Seam Binding Ribbon.


This second card is made with a Crumb Cake base and the sledging image from Welcome Christmas stamped in Crumb Cake ink at the bottom corner.  The Cherry Cobbler layer has been distressed using the Cutter Tool, and the Old Olive piece of card has been through the Big Shot with the Perfect Polka Dots Embossing Folder.  Again the sentiment was stamped and hand cut, then added to the card with Dimensionals.
The Cherry Cobbler Seam Binding Ribbon was wrapped into a bow shape and then the prongs of the brad were opened out and the ribbon pushed inside.  Closing the prongs and popping it through the Old Olive card layer then secures the bow.  The brad I used comes from the pack of Antique Brads (20 brads, 4 each of 5 designs for £5.50) which are gorgeous and a real bargain price.


 These are the lovely tags we made in class, 2 of each.  We made full use of the punches for these, which is exactly how the stamp set, Tags til Christmas, is designed.  However, if you don't have any punches you can very easily use a trimmer and mount them on square and rectangle pieces of card just as easily with the same fabulous results.


The punches used include the Decorative Label Punch, Scallop Circle Punch, Large and Extra Large Tag Punches, plus the Two tags Big Shot Die.

Here are all of the sets of five tags laid out for me to bag up for the craft fair.


And here they are all bagged up.  I used retired Jolly Holiday DSP and the Top Note Die with the Big Shot to create a bag topper.  Then I added a label using the Just Perfect Alphabet stamp set and Oval Punch.


I hope this has given you some inspiration for your Christmas wrapping, and I hope those attending the up-coming craft fairs I'm attending like my cards and tags too.

Happy Crafting
Julie xxx

Wednesday, 23 November 2011

Blue Angels Team Training

A few weeks ago a group of Blue Angels got together for a team training event hosted by the lovely Cate.  As usual at these events we all did swaps.

As I had been busily preparing for a craft fair and card class I was a bit limited on time to get swaps done, so I put these gift tags together in about 30 minutes!!!!  Christmas crafting doesn't have to take a long time!


These are the nine that I made all together.  I simply used the Large Tag Punch with the beautiful Holly Berry Bouquet DSP, then stuck this down onto Real Red card punched with the Extra Larger Tag Punch.  I stuck this to a piece of Wild Wasabi (my favourite colour of choice right now) and I trimmed around the edges to form an even larger tag.  I left a little more room at the bottom for the sentiment which comes from the ever so versatile Pennant Parade stamp set.  This was inked in Chocolate Chip.
I punched a hole using my Crop-o-dile and threaded through some 1/8" Real Red Taffeta ribbon to finish them off.
Here's a closer look:


I think I will be making some more of these to add to my Christmas gifts this year as I just think they are adorable.

The Details: 
Card / Paper - Wild Wasabi / Real Red / Holly Berry Bouquet DSP
Stamps / Ink - Pennant Parade / Chocolate Chip
Embellishments - Real Red 1/8" Taffeta Ribbon
Tools - Crop-o-dile / Large Tag and Extra-Large Tag Punches / Trimmer / Stampin Scrub and Mist

Tuesday, 22 November 2011

CONVENTION - the best trip ever................

Oh my, oh my, oh my, how excited was I last week as I was packing and preparing my swaps to attend my first ever Stampin' Up! Convention - and it was in Disneyland Paris...................  Stampin' Up! and Disney - my two most favourite things!!!!!

Well it was a whirlwind trip, manic, fun, exciting, lots of learning, loads of new things coming from Stampin' Up! over the next few months - plus I spent time with my team members, saw other familiar faces and met lots of lovely demos I'd not met before........... 

For anyone who doesn't know much about Stampin' Up! or is new to my blog - basically Stampin' Up! hold a European Convention each November.  Last year it was in the UK, this year in France, and next year it is in Germany.  We were lucky enough to find out about the lovely stamp sets and DSP that are going to form the SALE-A-BRATION promotion from 24th January - 31 March 2012, and equally as exciting, we also found out that we will be getting a SPRING MINI CATALOGUE in the UK for the first time ever..................

Now it's forbidden for us to show the stamp sets, or any of the promotional literature prior to the launch of these two exciting things, but we are allowed to show completed projects made using all of the new goodies.  I was very lucky and was a winner on a prize patrol and got to come home with a brand new punch and a la carte stamp, so as soon as I have put these into action I will show you my creations........

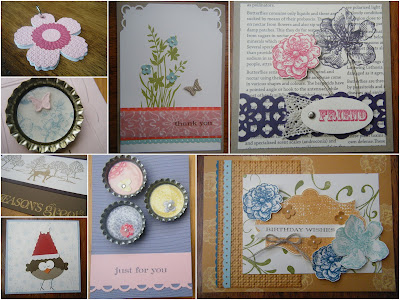
For now though, here are a few of the projects that were on the display boards:


and also some of my favourite swaps that I was so lucky to receive:


Gold Embossed Christmas card by Liz Archer
Thank You card by Jo Dumbleton
Friend card by Julie Kettlewell
Birthday Wishes card by Kerry Timms
Bottlecap Magnets x 3 by Sarah-Jane Rae
Bottlecap Brooch by Val Moody
Christmas Bird card by Emily Thompson
Flower Notebook by Evelyn Calder

I will be getting back on the posting trail and updating you with more pictures over the coming weeks, plus I have loads of class projects to share with you.............  

Until tomorrow - xxxx

Tuesday, 8 November 2011

New Product Card Class - Pennant Parade Christmas

Hello everyone,

This is the final card from the card class I ran in October.
It uses the ever so fabulous Pennant Parade stamp set and co-ordinating Pennant Builder Punch!

This layout is based on a card I saw at a recent training session on an Inspiration Station by Hayley Gillie.  

I have used the Just Add Cake DSP as the backing layer on this card, and from that I got the colour combination of Wild Wasabi and Poppy Parade.
The card base is Wild Wasabi and I have also used this for the tree.  I stamped the Christmas Tree Pennant image in Wild Wasabi onto Wild Wasabi card and then punched them out with the Pennant Builder Punch.  I did three and then folded them all in half and glued then to one another to make a 3D tree.  This add something extra to the card but is still practical as it folds flat to put in the envelope to post.


The pot the tree sits in and the star on top, plus the Merry sentiment and sun burst stamped image all come from the same stamp set.  It has so many bit to it for so many different occasions.

The left side of the card is edged with Poppy Parade card punched with the Lace Ribbon Border Punch.  I'm loving this punch so much...........

Here's a side view so you can see the dimension of the card.


If you have enjoyed seeing the cards from my last class and would like to join in with an upcoming class, then check out the details HERE.  In November I am running two classes, both Christmas themed!
If you would like any further details then please contact me - 07786266722 or craftybugjules@yahoo.co.uk

The Details: 
Card / Paper - Wild Wasabi / Poppy Parade / Whisper White / Just Add Cake DSP
Stamps / Ink - Pennant Parade / Poppy Parade / Early Espresso / Wild Wasabi / So Saffron
Embellishments - None
Tools - Lace Ribbon Border Punch / 1" Circle Punch / 1 1/4" Circle Punch / Itty Bitty Punch Pack / Bone Folder / Pennant Builder Punch / Dimensionals / Trimmer / Stampin Scrub and Mist

Sunday, 6 November 2011

New Product Card Class - Pennant Parade Birthday

Hello lovelies!

I hope you are enjoying my showcase of card from October's class.
The card today was based on one from a recent training event that we all made.  In training we used the Just Add Cake DSP and co-ordinating cards and ink, plus the luscious Scallop Dotty Ribbon.  I have changed things up slightly to incorporate the oh so pretty Cheerful Treat DSP that is one of the bargain Hostess products that can now be bought.

For anyone that doesn't know, hostess pounds have replaced hostess levels - and it makes things so much more versatile.  For the minimum qualifying party total or individual order of £150, you now get £25 hostess pounds.  There are gorgeous hostess only products you can buy at discounted prices, or you can spend it on anything in the main catalogue, or mix and match.  A pack of these papers in only £8 hostess pounds, so you still have enough left to get a stamp set or even two!!!!  Bargain..............

Right - back to the card :o)

The base is Bashful Blue, with a layer of Concord Crush that has been punched on the top and bottom edges with the Scallop Border Punch.  Lots of layers here as we then have Melon Mambo and finally Whisper White.  The Whisper White has been stamped with the star and sunburst images from Pennant Parade stamp set, inked in Lucky Limeade and Melon Mambo.  
The Cheerful Treat DSP has been used with the Pennant Builder Punch to get the banner, and the happy is stamped in Melon Mambo with the Just Perfect Alphabet then punched with the 3/4" Circle Punch.

Along the bottom there is Lucky Limeade Ruffled Ribbon and punched with the Modern Label Punch is the sentiment from another hostess product called Happiest Birthday Wishes.

This layout is fab and could be done in so many different colour combinations, and all you need to do is grab some DSP and take the colours from there.  So simple............

Why not have a go?

The final card from Octobers class uses the Pennant Parade stamp set for another Christmas themed card.  Be sure to come back and have a look.

xxxx

The Details: 
Card / Paper - Bashful Blue / Concord Crush / Melon Mambo / Whisper White / Cheerful Treat DSP
Stamps / Ink - Just Perfect Alphabet / Happiest Birthday Wishes / Melon Mambo
Embellishments - Lucky Limeade Ruffled Ribbon
Tools - Scallop Border Punch / 3/4" Circle Punch / Pennant Builder Punch / Modern Label Punch / Paper Snips / Dimensionals / Trimmer / Stampin Scrub and Mist / Sticky Strip

Friday, 4 November 2011

New Product Card Class - Button Buddies Snowman

A new Stampin' Up! catalogue and lovely new products must mean that Christmas isn't far behind!!!!

I added in a few Christmas cards to my card class this month to get everyone started............

This card uses a 4" x 4" base of Island Indigo, teamed with the gorgeous Cherry Cobbler!
The background is Serene Snowflakes stamped onto Whisper White, and then I ran the card through the Big Shot with the Perfect polka Dots Embossing Folder to give an even more snowy effect.

A length of the new Cherry Cobbler Seam Binding Ribbon was added down the middle of the card (love this ribbon, it's super soft and touchable!)

The snowman from Button Buddies was inked up with markers so I could get the body in Island Indigo and the hat in Cherry Cobbler.  This was stamped onto Whisper White and then punched out with the Decorative Label Punch.  I also used this punch with a piece of Cherry Cobbler, which was then chopped in half down the middle and used to edge the white piece.This was added to the centre of the card with Dimensionals.


A really simple design that could be done over and over for a batch of Christmas cards for friends, neighbours and co-workers.  I haven't actually added a button for the snowman on this card, but it would look great and give an added dimension to the card.

Coming up later in the week are the final two cards from class which use the versatile Pennant Parade stamp set and co-ordinating Pennant Builder Punch.

The Details: 
Card / Paper - Island Indigo / Whisper White / Cherry Cobbler
Stamps / Ink - Button Buddies / Serene Snowflakes / Cherry Cobbler / Island Indigo
Embellishments - Cherry Cobbler Seam Binding Ribbon
Tools - Perfect Polka Dots Embossing Folder / Decorative Label Punch / Dimensionals / Trimmer / Stampin Scrub and Mist / Tombow

Wednesday, 2 November 2011

New Product Card Class - Button Buddies Flowers

 As soon as I saw Button Buddies in the new catalogue, I feel in love with it!  I'm a bit of a button hoarder - I have loads of them and always forget to add them to my cards, so this set will really help me start using them as they are way to pretty and colourful to sit in the drawer!

The base of this card is Lucky Limeade - one of the gorgeous new In Colours.  It's really bright and vibrant.
I layered on some Daffodil Delight which was stamped all over with the flowers image from Confetti stamp set in Versamark ink.  It doesn't really show up very well in the picture though :o(

The vase of flowers image was inked with markers and stamped onto Whisper White, then the vase was stamped again and cut out.  It was added with Dimensionals.  The buttons were popped on with Mini Glue Dots, and then I added a bow with the new Ruffled Ribbon in Lucky Limeade.  This ribbon is just lush!


The sentiment is from Petite Pairs, inked in Island Indigo onto Whisper White.  It was punched out using the Decorative Label Punch.  I know it doesn't look like it, but with the use of a post-it-note you can use this punch to create all sorts of edges.  
This was layered with Dimensionals onto a Scallop Oval of Island Indigo.

Pop back for another visit to see the Christmas card I created using the cute Button Buddies stamp set :o)

The Details: 
Card / Paper - Lucky Limeade / Daffodil Delight / Island Indigo / Whisper White
Stamps / Ink - Petite Pairs / Confetti / Button Buddies / Island Indigo / Lucky Limeade / Daffodil Delight
Embellishments - Designer Buttons / Ruffled Ribbon
Tools - Decorative Label Punch / Scallop Oval Punch / Paper Snips / Trimmer / Stampin Scrub and Mist / Glue Dots / Tombow / Sticky Strip

Tuesday, 1 November 2011

November Hostess Freebies ! ! ! !

Dates

1 November – 15 December 2011

Promotion Details
Hostesses who host a £300 workshop from 1 November – 15 December will receive the Paisley Petals Bundle Set and a package of Paisley Petals Designer Series Paper - up to a £33.90 value - for FREE in addition to the regular hostess benefits!

Qualifying hostesses can choose between the wood- or clear-mount Paisley Petals Set.

Things to Remember
  • Customer, demonstrator, and workshop orders qualify for this promotion.
  • Workshop must total £300 in product sales before shipping and handling to qualify for bonus products.
  • There is no limit to the number of times a hostess can qualify for bonus products.
  • Bonus products cannot be exchanged or returned for credit.