About Me

My photo
I have been a Stampin' Up Demonstrator for almost two years now, and when I signed up it was just for the starter kit and discount on products........ I never imagined it would snowball into being a business like it has. I am a new Mummy to my little boy, Isaac, who is almost four months old now. I am spending my maternity leave enjoying watch him grow up, becoming his own little person, and also trying to build my business up. Stampin' Up! have amazing products and I would love to share my crafting passion with as many people as possible. I am always putting through orders, so if you need anything, or just want some information or advise, please do not hesitate to contact me. If you want to try before you buy, then check out my classes and get booked on.
Showing posts with label Masking. Show all posts

Monday, 11 July 2011

Stamp-a-ma-jiging

Happy Monday Folks........

I went all out for a one layer card design for the Less is More challenge this week, which is entitled "Something with Legs".............
I decided to have a go at masking and daubing in a background, followed my multiple use of the Stamp-a-ma-jig to get my image lined up, and that image came from various stamp sets too.


I began with a Sahara Sand card base and used those handy yellow sticky notes to mask off a square area.  I used a sponge dauber to add some Whisper White ink as a background.  I then used one of the Cute by the Inch (Level 2 Hostess set) stamps with the bird on a branch and used my markers to just ink the branch and leaves in Chocolate Chip and Wild Wasabi ink.  I stamped this and then inked again and lined up a second and third branch with the Stamp-a-ma-jig.
The bird image on my card is from the Four Frames set, again inked with markers, Soft Suede, and a little Cajun Craze.  I then carefully stamped the bird as if sitting on one of the branches.
Finally I inked the sentiment from the same Cute by the Inch stamp in Cajun Craze and popped it in the bottom right corner.

Really simple, but I think this is one of my favourite cards so far.............

The Details: 
Card / Paper - Sahara Sand
Stamps / Ink - Cute by the Inch (L2 Hostess) / Four Frames / Chocolate Chip / Whisper White / Wild Wasabi / Cajun Craze / Soft Suede
Embellishments - None
Tools - Sponge Dauber / Stamp-a-ma-jig / Trimmer / Stampin Scrub and Mist

Sunday, 26 June 2011

Vintage Vogue Flowers

Hello,

I hope you are all enjoying the fabulous sunshine that has finally emerged!?!?!?
My laptop is set up in the conservatory, so it's really hot in here.  This post will be a quick one!

I just wanted to show you the card I made for the Less is More Challenge this week.
I decided to grab my Vintage Vogue stamp set and try some masking to make the circles in this weeks sketch.
I knew I wanted to use Sahara Sand as the card base, and then looked to my Colour Coach to pick the other colours Bravo Burgundy and Pink Pirouette.  I used Pear Pizzazz as well, for the leafy stamp.


I punched circles of post-it note with 1 3/8" Circle Punch, placed them onto the Sahara Sand card base and then stamped the leaf image over the top.  I removed the masking and then inked up the flower from Vintage Vogue in Pink Pirouette and then did the rock and roll technique to get an outer layer of Bravo Burgundy on the stamp.  I used my Stamp-a-ma-jig to position the flowers correctly inside the circles.

Right, time to get out of the conservatory and get a nice cold drink :o)

The Details: 
Card / Paper - Sahara Sand
Stamps / Ink - Vintage Vogue / Bravo Burgundy / Pink Pirouette / Pear Pizzazz
Embellishments - None
Tools - 1 3/8" Circle Punch / Stamp-a-ma-jig / Trimmer / Stampin Scrub and Mist

Monday, 13 June 2011

Mojo Monday - on a Monday!

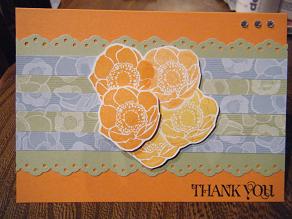
Whooo hoooo........  I actually found time to craft tonight and get my Mojo Monday card done on Monday!

I found it quite a tough one for some reason this week.  I'm not 100% convinced I even like the card, but you have to try new things and learn along the way :o)

You can view the sketch for this week here

I went with the Greenhouse Gala DSP and took the colours Pumpkin Pie, Daffodil Delight, Pear Pizzazz and Baja Breeze from the DSP.
I used strips of the small flower print to lay across the card base, edged with Pear Pizzazz card punched with the Eyelet Border.  I then gave masking a go with one of the stamps from the Ornate Flowers set.  I stamped the images in a circular pattern and cut them out.  I also cut out a singular flower and mounted both of these elements onto the card with dimensionals to give some interest to the card.  The sentiment is in Basic Black from the Curly Cute stamp set.  For a little extra touch I added the three Basic Rhinestones in the top right as suggested in the sketch.


Viola.......... does it work?  Let me know what you think!

The Details:
Card / Paper - Pumpkin Pie / Pear Pizzazz / Whisper White / Greenhouse Gala DSP
Stamps / Ink - Ornate Flowers / Curly Cute / Pumpkin Pie / Daffodil Delight / Basic Black
Embellishments - Basic Rhinestones
Tools - Eyelet Border Punch / Trimmer / Paper Snips / Dimensionals / 2-way Glue / Stampin Scrub and Mist