About Me

My photo
I have been a Stampin' Up Demonstrator for almost two years now, and when I signed up it was just for the starter kit and discount on products........ I never imagined it would snowball into being a business like it has. I am a new Mummy to my little boy, Isaac, who is almost four months old now. I am spending my maternity leave enjoying watch him grow up, becoming his own little person, and also trying to build my business up. Stampin' Up! have amazing products and I would love to share my crafting passion with as many people as possible. I am always putting through orders, so if you need anything, or just want some information or advise, please do not hesitate to contact me. If you want to try before you buy, then check out my classes and get booked on.
Showing posts with label Sunny Garden DSP. Show all posts

Thursday, 28 July 2011

Customer Thank You Cards

As you know, I had a couple of workshops last week, so this week I have taken delivery of all the goodies they ordered and have packaged them up for delivery.
I make a thank you card for everyone who orders, but the cards I made for the first bundle of deliveries I forgot to take a picture of - d'oh indeed!!!!

However, I shall be delivering another bundle of orders tomorrow so have made these simple little thank you cards to add to each persons package.


The card base is Pear Pizzazz, with a strip of Sunny Garden DSP added near the top.  I used the Fancy Flower Punch with Peach Parfait card, the 5 Petal Flower Punch with Poppy Parade card, and the flower from the Itty Bitty Shapes Punch Pack with Peach Parfait card also.  The edges of these flowers were sponge daubed in the same colour ink as the card colour, and then they were secured together with a Daffodil Delight Brad in the middle.  I added then to the card front with Dimensionals.
The Sentiment is from the Level 1 Hostess set called Afterthoughts.  It was inked with a Chocolate Chip Marker as I didn't want to use the whole image, just this part of it.


Quick and simple - I hope my lovely customers like them :o)

The Details: 
Card / Paper - Pear Pizzazz / Peach Parfait / Poppy Parade / Sunny Garden DSP
Stamps / Ink - Afterthoughts (Level 1 Hostess) / Chocolate Chip / Poppy Parade / Peach Parfait
Embellishments - Brads
Tools - Sponge Dauber / Mat Pack / Paper Piercing Tool / Tombow / Dimensionals / Trimmer / Stampin Scrub and Mist / 5 Petal Flower Punch / Fancy Flower Punch / Itty Bitty Shapes Punch Pack

Sunday, 8 May 2011

Double Challenge Day!

Another day, another challenge, or two.....
I'm enjoying doing challenges as it makes me think a bit differently, gives me some guidance, and in today's case, makes me use colours that aren't necessarily my first choice!

The first challenge is a sketch from Just Add Ink


I wanted a sunny and bright card, so used the Sunny Garden DSP for the side strip, mounted on Pear Pizzazz, and then stamped the words from Strength and Hope stamp set in Poppy Parade and mounted on the same colour card.  The gorgeous butterfly from the set is stamped in Pear Pizzazz and cut out and popped onto the card using dimensionals for some definition.  I added a few Basic Rhinestones for a bit of bling!
It's the first time I've used this stamp set and I was really pleased with the result.

The second challenge of the night was from The Paper Players website.  It was a colour challenge!
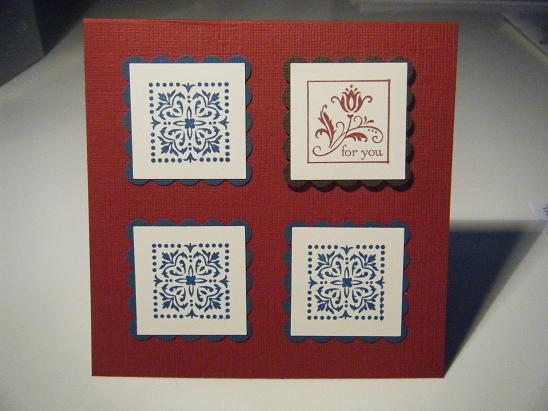
Cherry Cobbler, Not Quite Navy, Early Espresso and a neutral, so I picked Very Vanilla.

I've not used these colours before so kept the card nice and simple and used the Cute by the Inch stamp set, this is a level 2 hostess set and as the name suggests, it's so cute!

The Textured Card base is Cherry Cobbler which I really do love.  I stamped out three images in the Not Quite Navy and punched out with the large square punch, then mounted on a scalloped square of Not Quite Navy textured card.  The fourth image was stamped in Cherry Cobbler and mounted on Early Espresso and attached with dimensionals - gotta love those dimensionals, so handy :o)

Right, time for a sit down, cuppa tea, and a bit of choccy!

I'll be back tomorrow with another Mojo Monday - a happy start to the week :o)


The Details: 
Card / Paper - (1st card) Sunny Garden DSP / Pear Pizzazz, Poppy Parade, Peach Parfait, Very Vanilla card (2nd card) Cherry Cobbler, Not Quite Navy, Early Espresso textured card / Very Vanilla card
Stamps / Ink - (1st card) Strength and Hope / Poppy Parade and Pear Pizzazz / (2nd card) Cute by the Inch / Cherry Cobbler and Not Quite Navy
Embellishments - Basic Rhinestones
Tools - Trimmer / Stampin' Scrub & Mist / Clear Blocks / 1 1/4 inch Large Square Punch / Scallop Square Punch / Dimensionals

Saturday, 7 May 2011

Crafty Bug Mum.....

Oh, it's the weekend! Hoorrrraaayyyyyy..............

I had a lovely crafty morning round at my mums house today.  I limited myself to one box of goodies to haul over there, and decided to let mum take the reigns as to what she wanted to do.  I gave her some ideas and we got started.  My mum is a newbie to card craft, so she took her time getting to grips with the items, particularly the punches, but she mastered two-step stamping really well.  I was really pleased with what she created.

So here are the two cards my mum made today.


This first one was made using the Build A Blossom stamp set and Blossom Petals Punch in the mini catalogue.  There is so much you can do with these items, they are brilliant.  We stuck with mostly the In Colours, as they happened to be the ink pads I took with me.  We used the Designer Buttons to pop in the centre of the flower and alongside the sentiment.  The buttons looks so much nicer in real life than in the catalogue, it doesn't do them justice.  I love the way the Poppy Parade really stands out against the Basic Black textured card.


Now I think this card is a beauty.  Well done my mum xxx

Again we went with the In Colour palette.  The main three colours we used were Poppy Parade, Peach Parfait and Pear Pizzazz.  All three are colours from the Sunny Garden DSP.  We punched out sections with the large square punch and layered up with the scallop square extra-large punch.  The sentiment is from Something to Celebrate (level 2 hostess), on whisper white, punched with the large oval punch and mounted on Peach Parfait with the scallop oval extra-large punch.  The beautiful butterflies are in Poppy Parade, and made using the Beautiful Wings Embosslit Die.  

I think a big well done is deserved by my mum :o)

She's coming along with me to team training next weekend, so hopefully she now feels more prepared and is more familiar with the products.

Right, quick change, and time to head off.  I'm finally getting to give the Penguin Celebrate card to my friends for their anniversary tonight.  I really hope they like it xx

The Details: 

Card / Paper - Sunny Garden DSP / Poppy Parade / Whisper White / Pear Pizzazz / Basic Black / Peach Parfait
Stamps / Ink - Something to Celebrate /Pear Pizzazz / Poppy Parade / Build a Blossom
Embellishments - Designer Buttons
Tools - Beautiful Wings Embosslit Die / Mat Pack and Paper Piercing tool / Trimmer / Stampin Scrub & Mist / Clear Block C / Blossom Petals Punch / Scallop Oval Ex-Lrg / Oval Large / Scallop Square Ex-Lrg / Square Large / Eyelet Border punch