About Me

My photo
I have been a Stampin' Up Demonstrator for almost two years now, and when I signed up it was just for the starter kit and discount on products........ I never imagined it would snowball into being a business like it has. I am a new Mummy to my little boy, Isaac, who is almost four months old now. I am spending my maternity leave enjoying watch him grow up, becoming his own little person, and also trying to build my business up. Stampin' Up! have amazing products and I would love to share my crafting passion with as many people as possible. I am always putting through orders, so if you need anything, or just want some information or advise, please do not hesitate to contact me. If you want to try before you buy, then check out my classes and get booked on.

Sunday, 8 May 2011

Double Challenge Day!

Another day, another challenge, or two.....
I'm enjoying doing challenges as it makes me think a bit differently, gives me some guidance, and in today's case, makes me use colours that aren't necessarily my first choice!

The first challenge is a sketch from Just Add Ink


I wanted a sunny and bright card, so used the Sunny Garden DSP for the side strip, mounted on Pear Pizzazz, and then stamped the words from Strength and Hope stamp set in Poppy Parade and mounted on the same colour card.  The gorgeous butterfly from the set is stamped in Pear Pizzazz and cut out and popped onto the card using dimensionals for some definition.  I added a few Basic Rhinestones for a bit of bling!
It's the first time I've used this stamp set and I was really pleased with the result.

The second challenge of the night was from The Paper Players website.  It was a colour challenge!
Cherry Cobbler, Not Quite Navy, Early Espresso and a neutral, so I picked Very Vanilla.

I've not used these colours before so kept the card nice and simple and used the Cute by the Inch stamp set, this is a level 2 hostess set and as the name suggests, it's so cute!
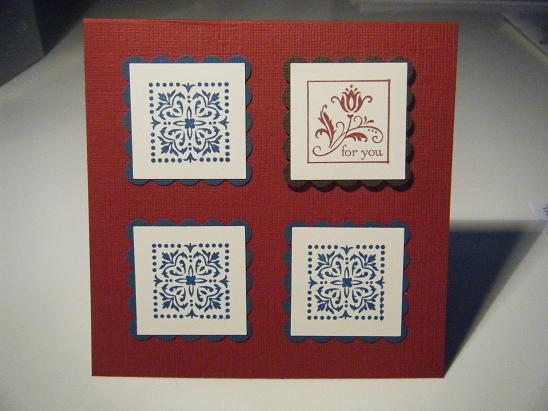
The Textured Card base is Cherry Cobbler which I really do love.  I stamped out three images in the Not Quite Navy and punched out with the large square punch, then mounted on a scalloped square of Not Quite Navy textured card.  The fourth image was stamped in Cherry Cobbler and mounted on Early Espresso and attached with dimensionals - gotta love those dimensionals, so handy :o)

Right, time for a sit down, cuppa tea, and a bit of choccy!

I'll be back tomorrow with another Mojo Monday - a happy start to the week :o)


The Details: 
Card / Paper - (1st card) Sunny Garden DSP / Pear Pizzazz, Poppy Parade, Peach Parfait, Very Vanilla card (2nd card) Cherry Cobbler, Not Quite Navy, Early Espresso textured card / Very Vanilla card
Stamps / Ink - (1st card) Strength and Hope / Poppy Parade and Pear Pizzazz / (2nd card) Cute by the Inch / Cherry Cobbler and Not Quite Navy
Embellishments - Basic Rhinestones
Tools - Trimmer / Stampin' Scrub & Mist / Clear Blocks / 1 1/4 inch Large Square Punch / Scallop Square Punch / Dimensionals

Saturday, 7 May 2011

Crafty Bug Mum.....

Oh, it's the weekend! Hoorrrraaayyyyyy..............

I had a lovely crafty morning round at my mums house today.  I limited myself to one box of goodies to haul over there, and decided to let mum take the reigns as to what she wanted to do.  I gave her some ideas and we got started.  My mum is a newbie to card craft, so she took her time getting to grips with the items, particularly the punches, but she mastered two-step stamping really well.  I was really pleased with what she created.

So here are the two cards my mum made today.


This first one was made using the Build A Blossom stamp set and Blossom Petals Punch in the mini catalogue.  There is so much you can do with these items, they are brilliant.  We stuck with mostly the In Colours, as they happened to be the ink pads I took with me.  We used the Designer Buttons to pop in the centre of the flower and alongside the sentiment.  The buttons looks so much nicer in real life than in the catalogue, it doesn't do them justice.  I love the way the Poppy Parade really stands out against the Basic Black textured card.


Now I think this card is a beauty.  Well done my mum xxx

Again we went with the In Colour palette.  The main three colours we used were Poppy Parade, Peach Parfait and Pear Pizzazz.  All three are colours from the Sunny Garden DSP.  We punched out sections with the large square punch and layered up with the scallop square extra-large punch.  The sentiment is from Something to Celebrate (level 2 hostess), on whisper white, punched with the large oval punch and mounted on Peach Parfait with the scallop oval extra-large punch.  The beautiful butterflies are in Poppy Parade, and made using the Beautiful Wings Embosslit Die.  

I think a big well done is deserved by my mum :o)

She's coming along with me to team training next weekend, so hopefully she now feels more prepared and is more familiar with the products.

Right, quick change, and time to head off.  I'm finally getting to give the Penguin Celebrate card to my friends for their anniversary tonight.  I really hope they like it xx

The Details: 

Card / Paper - Sunny Garden DSP / Poppy Parade / Whisper White / Pear Pizzazz / Basic Black / Peach Parfait
Stamps / Ink - Something to Celebrate /Pear Pizzazz / Poppy Parade / Build a Blossom
Embellishments - Designer Buttons
Tools - Beautiful Wings Embosslit Die / Mat Pack and Paper Piercing tool / Trimmer / Stampin Scrub & Mist / Clear Block C / Blossom Petals Punch / Scallop Oval Ex-Lrg / Oval Large / Scallop Square Ex-Lrg / Square Large / Eyelet Border punch

Thursday, 5 May 2011

More Butterflies - PPA92 Celebrity Color Challenge

Two posts in one day - I'm addicted!

I thought I'd take part in another challenge today - this time it's a Pals Paper Arts Colour Challenge!

This weeks challenge is all about working with the wonderful spring palette of Pear Pizzazz, Peach Parfait and Poppy Parade.

I decided to use a couple of products I've not played with before - the Eyelet Border punch and the All a Flutter a la carte stamp (one of the great single stamps you can buy from the main catalogue - inside the back page)


I've stamped the butterfly onto whisper white card in peach parfait, though I thought it would be nice to have one stand out a little more, so I inked it in peach and then coloured the body and wing edges with the poppy parade marker before stamping onto the centre of the card.  The card base is poppy parade also, and I've added in pear pizzazz by way of a border punched from the DSP Pack - In Colour which is a level 1 hostess product.

Summer is on the way, and so are the butterflies :o)

The Details: 
Card / Paper - Poppy Parade / Whisper White / DSP Pack - In Colour Pear Pizzazz
Stamps / Ink - All a Flutter / Peach Parfait / Poppy Parade marker
Embellishments - None 
Tools - Eyelet Border Punch / Two-way Glue / Stampin Scrub & Mist / Trimmer

Thankyou Katie!

Just a quick one this morning!

This is a little card I have just popped through the door of my upline Katie.
She introduced me to Stampin' Up!, has given me advice and was very supportive and informative while I was making the decision to become a demonstrator, so I just wanted to say Thank You Katie :o)


This is one of the stamps that comes as part of the standard starter kit (though you can substitute lots of the items and make the starter kit personal to you).  I inked it up in the different colours using the marker pens, they make it so easy to use multiple colours on one stamped image, and best of all they match to all the other products.

I'll try and use a different colour family for my next post!  I do love those BRIGHTS!

The Details: 
Card / Paper - Melon Mambo base card / Tempting Turquoise / Whisper White / Daffodil Delight
Stamps / Ink - So Many Thanks / Marker Pens in Tempting Turquoise, Melon Mambo and Daffodil Delight
Embellishments - Brads 
Tools - Paper Piercing tool and mat / Snail / Dimensionals / Stampin' Scrub & Mist

Wednesday, 4 May 2011

Beautiful Wings - it finally arrived!

I placed a product order a few weeks back now, and the one item I desperately wanted was out of stock :o( 
Well today it finally arrived, and I was so excited I went straight to my craft room and started making a card.
In the new mini catalogue are lots of die cutting plates from Sizzix, many of which are exclusive to Stampin' Up! and cannot be purchased anywhere else.  
Beautiful Wings is an Embosslit Die - a unique die with a positive and negative image that simultaneously cuts and embosses a variety of designs on card or DSP.
Here is the card I made - sweet and simple!
I ran Melon Mambo, Tempting Turquoise and Pumpkin Pie through my die cutting machine in the embosslit and got this lovely variety of butterflies, and more to spare.
The sentiment is from the SAB set So Happy For You (sadly now retired, sorry)
I punched it out with the new Decorative Label Punch, smaller by feeding it in and cutting down the sides to fit nicely around the words.  I also cut edges of Basic Black with the same punch and layered them to the back to give it a shadow effect and make it stand out from the Whisper White card base the butterflies are mounted on.

This card fits in nicely with the current SUO Challenge 18 - In Celebration Of Butterflies so I'm going to join in and pop my card in the gallery.

Hope you like it xx

The Details: 
Card / Paper - Basic Black Textured / Whisper White / Melon Mambo / Tempting Turquoise / Pumpkin Pie
Stamps / Ink - So Happy For You (SAB) / Melon Mambo 
Embellishments - None
Tools - Decorative Label Punch / Beautiful Wings Embosslit / Snail / Two-way Glue Pen / Dimensionals / Stampin' Scrub & Mist

Monday, 2 May 2011

Mojo Monday!

Oh my goodness - it seems like it was only a few days since I finished work for a week off, but already it's time to go back..............  And it's going to be so busy!!!  Looking on the bright side, there are only four days until the weekend :o)

I thought I'd do something new today - there are lots of card challenges you can join in with, so I thought I'd give Mojo Monday a go.  Basically a team of people come up with templates/sketches for cards, or maybe a colour scheme, it's posted on the site, along with actual cards made by the design team based on the challenge, then you have a go and upload your card to the gallery.

You can see what I mean by going to Mojo Monday

I kept with a summer theme for my card, using the Summer Splash stamp set which I also used last week.  Again I stuck with the brights palette for the colours, but this time I added in the lovely real red and pacific point with the tangerine tango.


I hope you like it!

The Details:
Card / Paper - Tangerine Tango / Real Red / Pacific Point / Real Red DSP
Stamps / Ink - Summer Splash / Something to Celebrate (level 2 hostess) / Tangerine Tango / Real Red / Pacific Point
Embellishments -Brads in Pumpkin Pie / Linen Thread
Tools - Clear Block G & E / Stampin Scrub & Mist / 1 1/2" Scallop Square Punch (for the sentiment) / Dimensionals / Snail

Sunday, 1 May 2011

Baby Blossoms Galore

Happy Sunday!

I've had the baby blossoms stamps set for a few weeks now, and I keep looking at it and then I always pick out something else to work with.  Well today is the day I tackle the baby blossoms.

I didn't really have a card for a specific occasion or person in mind, so I thought I create my own Designer Series Paper (DSP) with the stamp set and then I could use it when I need a card in a hurry.

Yes, I do realise that the Springtime Vintage Suite that this stamp set falls into also has a set of DSP that co-ordinates, but it's so much more fun creating your own personalised paper.  Just nod along with me...... 

I used lots of the various flower and leaf combinations, but I stuck to a colour palette that I selected from the trusty Colour Coach - Pinks / Yellows / Greens.

Here is the finished article!


I can't believe after more than a week off work (bank holidays are just fab!), that there's only one more day before everything goes back to normal.  Hopefully I'll get some crafting time in tomorrow as I am now off out to visit family, probably a garden centre and have a yummy pub lunch.  My tummy is rumbling already.

Have a good day xxx

The Details:
Card / Paper - Very Vanilla A4 card
Stamps / Ink - Baby Blossoms /Soft Suede / More Mustard over So Saffron / Rose Red over Blushing Bride (In Colour) / Wild Wasabi over Certainly Celery
Embellishments - None
Tools - Clear Block A / Stampin Scrub & Mist

Saturday, 30 April 2011

Sail Away.......

Hello.......

How nice has the weather been?  Maybe not everywhere, but my back garden has been so sunny.  I'm sure the water is still chilly, but being at the beach these past few days would have been lovely I'm sure.
With that thought in mind, late this afternoon I decided to pick up my new Sail Away stamp.  This is in the mini catalogue right now and is an "a la carte" stamp, great value, and really good for male cards.  Always something I struggle with a bit.

So I was in the bathroom earlier on, stay with me as this is leading somewhere, and I happened to notice the box of tissues and it made me wonder if I could stamp on tissue.  I'd been thinking of using this stamp with vellum, but I don't have any, so thought I'd give the tissue a go.

Let me know what you think.......  personally I think it turned out pretty good.

I used two way glue pen to adhere it to the marina mist card which I had embossed with the lattice squares embossing folder.  It really helps to just add something a little extra to the card.
I do feel something is lacking in the top right corner though, so will be adding a couple of perfect plum brads, but they won't be here until my order arrives on Wednesday.

Hope you like it xxx

The Details:
Card / Paper - Tissue (any brand will do!) / Marina Mist / Perfect Plum
Stamps / Ink - Sail Away / Concord Crush (In Colour)
Embellishments - Perfect Plum Brads (to be added)
Tools - Trimmer / Lattice Square Embossing Folder / / Snail / 2-Way Glue Pen / Stampin Scrub & Mist