About Me

My photo
I have been a Stampin' Up Demonstrator for almost two years now, and when I signed up it was just for the starter kit and discount on products........ I never imagined it would snowball into being a business like it has. I am a new Mummy to my little boy, Isaac, who is almost four months old now. I am spending my maternity leave enjoying watch him grow up, becoming his own little person, and also trying to build my business up. Stampin' Up! have amazing products and I would love to share my crafting passion with as many people as possible. I am always putting through orders, so if you need anything, or just want some information or advise, please do not hesitate to contact me. If you want to try before you buy, then check out my classes and get booked on.

Wednesday, 4 January 2012

Spring Mini Catalogue Blog Hop

Hello,

Welcome to The Crafty Bug stop on this Spring Mini Catalogue Blog Hop!!!!!  I hope you have been enjoying your journey, or if this is your first stop, then please just keep following the links and work your way around all 22 stops.  If you've come from Jayne's blog, then I'm sure you will have loved her card using the Marry Me stamp set and Pocketful of Posies DSP - gorgeous............

I am so excited that for the first time ever, the UK has a Spring Mini.  It's packed full of wonderful crafting products that will be available through until 30th April 2012.

Let's get cracking:

First up is a card made with a new a la carte stamp that I got during convention when I won a prize patrol.  It's called Liebe, Love, Amour which is just perfect for Valentines without being too cutesy.  It co-ordinates with the new 2 3/8 " Scallop Circle Punch - I apologise for my dreadful photography skills, the card is straight in real life!


The card base is Basic Gray, layered with the gorgeous new Red Glimmer Paper.  It's so sparkly and shiny, I just love it.  I've rounded the corners, and then stamped the Liebe, Love, Amour stamp several times on Very Vanilla with Basic Gray and Real Red ink.  These have been punched out and layered using Dimensionals, then finished off with a Red Rhinestone Brad in the centre.  


This second card uses the products and colours from the new Spice Cake product suite. 
The card base is Soft Suede, layered with More Mustard which was run through the Big Shot with the Lattice Square Embossing Folder, and Pool Party, one of the In Colors of 2011/2012.


The Pool Party card has been stamped in Soft Suede with the border image from the Spiced Paisley stamp set.  I have created a woven paper mesh with 1cm wide strips of Spice Cake DSP. 


I finished this card off with the floral image from Spiced Paisley stamp set inked in Pool Party.  The sentiment is from the Hostess stamp set, Happiest Birthday Wishes.  I used a Soft Suede marker to ink just the wording of this stamp, then stamped it over the Paisley image using my Stamp-a-ma-jig to line it up just right.


Next up is a very cute and simple card made using the Perfect Postage stamp set and co-ordinating Postage Stamp Punch.  


The card base is Crumb Cake, and I have then used each of the five 2011/2012 In Colours with the new Postage Stamp Punch.  These have been layered on top of each other.  The final one is Very Vanilla and I stamped it with the Bunny image in Crumb Cake ink.  I stamped a second time onto Calypso Coral card and then cut out the little balloon and layered it on top.  The sentiment Sweet Friend is from the gorgeous You Are Loved stamp set - that's coming up in a minute :o)

Here's another potential Valentine creation, again using the Perfect Postage stamp set and punch, along with that lovely Red Glimmer Paper.
 

The base is Real Red card, with a layer of Chocolate Chip which has been embossed with the Perfect Polka Dots Embossing Folder using the Big Shot.  I stamped the i and u from Just Perfect Alphabet in Real Red ink onto Very Vanilla and punched them out.


The Heart image is stamped in Chocolate Chip ink, then layered onto a piece of Red Glimmer Paper punch with the Curly Label Punch.  A couple of strips of Red Glimmer Paper were also added under the i and u, with each element being stuck on with Dimensionals to give some height.


I've saved my favourite for last - this card is made using the You Are Loved stamp set.  The set includes a sentiment that reads Happy Valentines Day, but with 6 other stamps in the set that can be used all year round I think this stamp set is just beautiful.


I've used the large heart image and inked it with markers before stamping onto Very Vanilla card.  The colours are Lucky Limeade, Wisteria Wonder, Cherry Cobbler and Pink Pirouette.  I cut the heart shape out free hand, simpler than you might think, then used Sticky Strip to attach Lucky Limeade Ruffled Ribbon, which I ruffled even more.  


The card base is Wisteria Wonder and I have stamped the flower image to give a subtle background.  I inked the stamp with Wisteria Wonder ink, stamped off on some scrap paper then stamped onto the card front.  The sentiment wasn't stamped off, so is slightly darker.  I love the tone on tone effect of this card.


I hope that the creations I have made will inspire you - please leave a comment and let me know what you think.

Now it's time to head off to see what Fiona has in store for you!

Thanks so much for visiting - Enjoy xxx


If any links are not working, or you find yourself a little lost along the way, here is a full list of all participants in the Spring Mini Catalogue Blog Hop

1. Alison P - www.craftyalisoninlyon.blogspot.com
2. Daisydaye - www.emma-daye.blogspot.com
3. Sarnie - www.kraftybiker.blogspot.com
4. CarolynUK - www.stampaholix.blogspot.com
5. Tracey R - www.derbyshireducks.blogspot.com
6. Kara M - http://karascraftycorner.blogspot.com
7. Hayley (craftydevils) - www.mycrafthaven.blogspot.com
8. Emma_H - www.emma-letsstamp.blogspot.com
9. Kate - http://stampinupwithkate.blogspot.com/
http://my-next-chapter.blogspot.com
11. TinaFaghy - http://littlewhitehousecrafts.blogspot.com
12. Donna M - http://www.head-over-heels-by-dlm.blogspot.com
13. Laura - http://airingcupboardstamping.blogspot.com
14. Charlie - http://craftylittlemoos.blogspot.com/
15. Sara (craftingandstamping.com) - http://craftingandstamping.com
16. Leanie - http://www.beautifulimpressions.co.uk
17. LittleBeckie (Beckie) - http://www.bextiesandstickytape.blogspot.com
18. Jayne (charliemenace) - http://jaynescraftycorner.blogspot.com
19. Julie H (craftybug) - http://www.the-crafty-bug.blogspot.com
20. Fiona W - http://oakfieldcrafts.blogspot.com
21. Natalie - http://www.natalieoshea.co.uk/blog.html
22. Rozelle (LittleMoo6) - http://thepapercraftsessions.blogspot.com

Monday, 2 January 2012

New Year, New Classes

A new year means new classes
 
Come and be a Crafty Bug at my Saturday card classes. 
21st January

Cupcake Class
Using the NEW Create a Cupcake stamp set and Cupcake Builder Punch
(available in the Spring Mini Catalogue from 4th January)
£12.50
This class includes a product bag containing buttons, brads and ribbon.  
You will be using some on your projects, but there will still be plenty to take home.

Sneak Peek


You'll be surprised at how much you can create from a cupcake!
 
For further information, more class dates, and booking information click HERE 

Friday, 23 December 2011

Christmas Craft Fair Makes

Wow, I really went a little overboard on making bits to sell at fairs this Christmas.  I had four stalls in the run up to Christmas, and by working all hours before the first one it certainly meant an easier ride along the way with the others as I had so much stock.  Of course I still thought of other things to make!!!  I had quite a bit left over, but it's made little stocking filler gifts easier, and the girls I work with also bought lots of bits and pieces too.

It's was all quite a labour of love and certainly not something you do to make lots of cash, but I enjoyed having my mum along to help me out, and it also meant I got to see lots of other crafty bits and get some Christmas presents for friends and family too.

So, here's lots of the things I made............

 Magnetic note pads / Stamped Candles / Pencil and Eraser sets / 
Magnetic Memo Board Pegs / Mini Post-it Keyrings
 Bottle Cap Magnet Packs
 Tree Chocolates - Elizabeth Shaw Mints (yummy.........)
Decorated Gift Boxes
 Reindeer Food - such a cute idea for kids - these were a really good seller.  Inside the test tube was muesli mixed with cake decorating glitter (safe for the birds)
 Some of the stash of Reindeer Food

 Snowman Poop bags and Reindeer Spare Red Noses
(otherwise known as white chocolate buttons, and strawberry fruit pieces)
 Magnetic Bookmarks
 Magnetic Notebooks
 Mini Post-it Note Key Rings
 This was the first stall we did.  I didn't take pictures of any of the others, though we found better ways to display everything as each one went along.............
 My dinky little helper - also know as Best Mum in the World!
 Variety of Owl Key Rings
 Post-it pad notebooks - I did 6 different designs of these

There were more bits that I made for the later fairs, but I simply didn't have time to photograph everything before packaging it up and putting it in boxes to take.

I will definitely be doing more fairs, but now I know that the prep time needs to be quadrupled if I want to get more than 5 hours sleep a night!!!!!!

Definitely too many products to mention, probably something for nearly every page in the catalogue!

I hope you liked seeing what I made :o)

Thursday, 22 December 2011

Finally the last card from class!!!

Oh my, oh my.................  it's only 3 days left until Christmas and I have been such a bad blogger of late that I'm sure to be crossed off Santa's list!!!  I hope it doesn't work like that.........

I'm finally getting around to posting the final card from my Christmas Card Class at the end of November.  Since then there has also been a December class where we did thank-you cards, and I will try really hard to get those posted before the New year rolls around.

Unfortunately I'm working between Christmas and New Year, but I hope to have a play with loads of NEW Stampin' Up! goodies that have been arriving these past few weeks on my doorstep.  I;m sure it hasn't escaped anyone's attention that Stampin' Up! are for the first time ever releasing a SPRING MINI catalogue on 4th January!  There are lots of lovely things, and I hope to post a few sneak peeks for you over the next week.

However, on with today's card.................

A lovely Christmassy Santa Owl punch art card that was inspired by a card I saw on a sample board at Convention.  I'm not sure who's the card was, but I changed mine up a little.


The card base is Old Olive, with a night sky layer of Night of Navy.  I stamped some snowflakes in Whisper White from Serene Snowflakes stamp set.  The roofing is Basic Gray card, punched with the Scallop Border Punch and dauber with Whisper White ink.  The Chimney is a 1 1/4" Square of Textured Cajun Craze, lined up with another piece punched with the Word Window Punch.  Again these were daubed for a snowy effect.
My owl was punched from Chocolate Chip card.  I stamped the Santa Suit image from Tags til Christmas and punched it using the Owl Punch for the chest piece, and added eyes and a Santa hat.  The present is simply a piece of Daffodil Delight punched with the 1 1/4" Square and then tied with some Linen Thread.

I used this design for another card which I will show you before the year is out.  One of the girls at work asked me to make cards for her Grandsons.  One of them has never had anything with his name on as they can never find it.  I also had a very strange request for a Christmas card relating to peanuts!!!!  I worked with it and was really pleased with the results.............  Check back to see what on earth I am talking about!

Saturday, 10 December 2011

Best Birthday Card Ever!!!!!

Hi everyone,

Just a really quick post today, of a card that wasn't made by me..............

It's my birthday and my other half presented me with my Birthday Card very excitedly..........  he'd raided my craft room, gone through all my piles and drawers of stamps, and made a card for me all himself. 

I was so touched by this, that he'd put such effort in, and the card itself doesn't look like it's a first attempt by someone, it looks great, so I really wanted to share it.


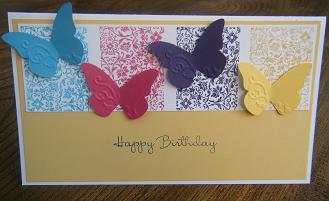
He used the Clearly For You background stamp in Melon Mambo, Tempting Turquoise, Elegant Eggplant and Daffodil Delight, with matching coloured butterflies that I had in a scraps box.


Definitely the best card ever, thank you honey xxxx

Thursday, 8 December 2011

Card Class - Christmas Time Card 4

We are almost at the end of show and tell from my Christmas Card Class, I do hope you enjoyed seeing the cards we made.

The card today I love because of it's subtle look, but there are quite a few elements to it.

The card base is Cherry Cobbler, with a layer of Crumb Cake on top.  The Crumb Cake layer was stamped 3/4 way down with Serene Snowflakes in Versamark ink and covered in Cherry Cobbler Embossing Powder.  This was heated creating a lovely bright, textured background.
There was a further layer of Cherry Cobbler card and Crumb Cake card.  The Crumb Cake layer was put through the Big Shot with the Perfect polka Dots Embossing Folder.


To top if off we added a 3D decoration.  The image from Contempo Christmas was stamped onto Very Vanilla three times in Cherry Cobbler ink, then all three punched out with the Ornament Punch.  They were folded in half and glued to form the 3D shape.  I bow made from 1/8" Very Vanilla Taffeta Ribbon was added above with a glue dot.

At the bottom we added a length of Cherry Cobbler Seam Binding Ribbon and the sentiment from Contempo Christmas inked in Cherry Cobbler as well.


My friends have asked me to make them some of these cards to send to family, but they want a blue theme.  I 
will post a picture when I've finished them off.

I have one last card from this class to show you - it's very much Punch Art gone crazy.  It will be on my blog before the week is out :o)

The Details: 
Card / Paper - Cherry Cobbler / Very Vanilla / Crumb Cake
Stamps / Ink - Contempo Christmas / Cherry Cobbler / Serene Snowflakes
Embellishments - 1/8" Very Vanilla Taffeta Ribbon / 1/2" Cherry Cobbler Seam Binding Ribbon / Cherry Cobbler Embossing Powder
Tools - Ornament Punch / Perfect Polka Dot Embossing Folder / Big Shot / Heat Gun / Trimmer / Glue Dots

Wednesday, 7 December 2011

Card Class - Christmas Time Card 3

Hi everyone,

Round three on my Christmas Card Class makes, and this one uses a technique that I had heard about before, but saw it put into practise at Convention and knew I had to try it as soon as I got home!


It's called partial embossing!!!!!  It's really gives a card the WOW factor and is a technique I will be using again and again.

You basically run a piece of chip board through the Big Shot in the embossing folder you want the pattern of, in this case it was the Vintage Wallpaper Embossing Folder.  Then I cut out the shape I wanted.  The chip board was quite tough, so cutting was a little bit of hard work, but so worth it!  The I used a little two-way glue dabbed on the chipboard to stick it to the outside of the embossing folder, lining the pattern up.  I know pictures would help make more sense of this, but I hope you know what I mean.  When you put a piece of card inside the embossing folder and run it through the Big Shot, the image only transfers through where the chipboard is.
By using the two way glue you can remove the chipboard when you want to use the embossing folder in the usual way, or if you want to adhere a different chip board piece.

Here's a close-up:


So, for the rest of the card - I did this technique on Garden Green card and then punched twice with the Ornament Punch.  I used Sticky Strip to adhere the beautiful and fun Candy Cane Designer Fabric to the Real Red card base (with a piece of Whisper White behind the fabric so the red didn't show through), and then mounted the Garden Green punched / embossed card over the top with Dimensionals.  The sentiment is from Contempo Christmas, inked in Real Red on Whisper White, and then punched with the Modern Label Punch.  I also used this punch with Real Red card, which I then chopped in half and used to back the sentiment at each end.

I hope you will be giving this technique a try.  If my instructions didn't make sense, please do email me and I will try and help make it clearer.

The Details: 
Card / Paper - Real Red / Whisper White / Garden Green / Candy Cane Designer Fabric
Stamps / Ink -Real Red / Contempo Christmas
Embellishments - None
Tools - Big Shot / Vintage Wallpaper Embossing Folder / Modern Label Punch / Ornament Punch / Trimmer / Dimensionals / Sticky Strip

Tuesday, 6 December 2011

Card Class - Christmas Time Card 2

This Origami Tree card was a massive hit at my Christmas Card Class last weekend!
It is a really simply technique, with such a gorgeous finished effect............  When I delivered orders to two of the ladies at class, they both told me they'd been making more of these, and one of the ladies had made 50 of them and had samples ready to show me!!!!  Fabulous...................

We used the Holly Berry Bouquet DSP for the origami Christmas tree.  You can pick any two pattern papers, they all work together beautifully.  I picked out the colours in the DSP to use for the card base and Top Note layer.


I will try and do a tutorial on how to fold the paper to make these trees over the next few days, so pop back and check it out :o)


The trees were formed, and then layered onto a piece of card cut with the Top Note Die and Big Shot.  The main card base was stamped with the Serene Snowflakes images with Versamark to give that subtle watermark effect.  Tricky to pick up in the photos sadly, but it is there.

The sentiment on these cards is from Petite Pairs, as these are pictures of cards I made for craft fairs.  At class we used the Merry Christmas sentiment from Contempo Christmas.


The card was topped off with a Rhinestone brad to act as a star on the top of the tree.  Here you can see a different DSP tree variation and card base colour combination.

The Details: 
Card / Paper - Real Red / Chocolate Chip / Wild Wasabi / Holly Berry Bouquet DSP
Stamps / Ink - Serene Snowflakes / Versamark / Chocolate Chip / Contempo Christmas / Petite Pairs
Embellishments - Rhinestone Brads
Tools - Big Shot / Top Note Die / Sticky Strip / Trimmer / Mat Pack and Paper Piercing Tool