About Me

My photo
I have been a Stampin' Up Demonstrator for almost two years now, and when I signed up it was just for the starter kit and discount on products........ I never imagined it would snowball into being a business like it has. I am a new Mummy to my little boy, Isaac, who is almost four months old now. I am spending my maternity leave enjoying watch him grow up, becoming his own little person, and also trying to build my business up. Stampin' Up! have amazing products and I would love to share my crafting passion with as many people as possible. I am always putting through orders, so if you need anything, or just want some information or advise, please do not hesitate to contact me. If you want to try before you buy, then check out my classes and get booked on.

Thursday, 30 June 2011

Congratulations!

Is it me, or does there seem to be lots and lots of pregnant ladies out there at the moment?
Three people I know are pregnant at the moment, with one about to drop any day now!  And everywhere I go there are bumps around........
One of the lovely ladies I work with has just found out her friend is expecting, so she asked me to make a card to send her.

I thought I'd give the Baby Grow card a go.  I've seen lots of these cards on various sites and think they are so cute.  


I used Nursery Suite DSP for the edging, and went with the So Saffron colouring as this is a great neutral colour.  I used Whisper White to make an A6 card base and used the Perfect Polka Dots Embossing Folder to give it a lovely texture.  I then cut the sides in at an angle and used the 1 3/8" circle punch to make the leg holes and the neck line.  I used the same punch on the DSP and then used the 1 3/4" Scallop Circle Punch to get scalloped rings to stick onto the card.  The little duck comes from the Every Little Bit stamp set, inked in So Saffron and I used the Aqua Painter to colour it in lightly.  Too much water makes the Whisper White card bobble, so use as little as possible just to get a smudge of colour.  This was punched and mounted.
I also added a sentiment inside as well, but forgot to take a picture of this.  It was from the Bundle of Love stamp set.

I hope your friend likes the card Dee Dee :o)

The Details: 
Card / Paper - Whisper White / Nursery Suite DSP
Stamps / Ink - Bundle of Love / Every Little Bit / So Saffron
Embellishments - None
Tools -Aqua Painter / 1 3/8" Circle Punch / 1 3/4" Scallop Circle Punch / Trimmer / 2-Way Glue / Dimensionals / Perfect Polka Dot Embossing Folder

Wednesday, 29 June 2011

Square Flowers!

Hello everyone - just a quick card today :o)

I used the trusty Colour Coach to get the combo of Real Red, Pumpkin Pie and Early Espresso.
I used the Ornate Flowers stamp set and stamped one of the flowers in Real Red and Pumpkin Pie all over a piece of Whisper White card.  I then cut this into small squares which a stuck down onto a piece of Early Espresso.  This was mounted onto a card base of Pumpkin Pie.
Finally I stamped the same image in Real Red onto Whisper White, adding a sentiment from Tiny Tags in Early Espresso.  This was mounted onto Pumpkin Pie and then added to the card with Dimensionals.
Voila - a really quick and easy one today!


Thanks for visiting :o)

The Details: 
Card / Paper - Pumpkin Pie / Early Espresso / Whisper White
Stamps / Ink - Ornate Flowers / Tiny Tags / Real Red / Pumpkin Pie / Early Espresso
Embellishments - None
Tools - Trimmer / Stamp-a-ma-jig / Snail / Dimensionals / Stampin Scrub and Mist

Tuesday, 28 June 2011

Paper Players Challenge # 53 - Growing Green

Good Morning!

I decided to try out a few different techniques while making this card for the Paper Players Challenge this week.  Yet another sketch challenge - it seems to be the week for sketches!

I went with a Very Vanilla card base, and then cut some Soft Suede and Melon Mambo pieces of card.
I thought the Growing Green stamp set would lend itself very well to using with bleach - yes, you heard right, bleach!  
You have to be very careful when doing this and work pretty swiftly.  I put some folded up kitchen towel on a small plate and poured on some bleach so it saturates the kitchen towel.  Press your stamp into the kitchen towel and stamp immediately onto the card.  Depending on the colour card you use, you get different colours coming through where the bleach hits the card.  You must press down firmly, and then keep going until the card is covered with the desired image.  Wash the stamp right away!  Be careful not to spill any of the bleach as well :o)


This effect on Soft Suede gives a lovely golden brown colour, whilst on the Melon Mambo is came through almost white.

I then stamped some of the images with Versamark onto Water Colour Paper.  I added white embossing powder and heat set this with my heat gun.  I used my Aqua Painter to then colour the flowers in with Melon Mambo ink.  These were cut out and mounted onto the card front with Dimensionals.  The sentiment is from Afterthoughts (Level 1 Hostess) stamped in Soft Suede.

Rather a mixed bag card, but I actually really like it.  Half way through making it, that was in dispute, but it turned out better than I thought.

Please leave me a comment and let me know what you think.........
If you would be interested in learning how to do these techniques, or if you've fallen in love with the Growing Green stamp set, then contact me HERE

The Details: 
Card / Paper - Very Vanilla / Soft Suede / Melon Mambo / Water Colour Paper
Stamps / Ink - Growing Green / Afterthoughts (Level 1 Hostess) / Soft Suede / Melon Mambo / Versmark
Embellishments - None
Tools - White Embossing Powder / Bleach / Paper Snips / Dimensionals / Snail / Trimmer / Stampin Scrub and Mist / Stamp-a-ma-jig

Monday, 27 June 2011

Stamping 411 - Sketch

When I saw this weeks Stamping 411 Sketch I couldn't wait to get started.
Straight away I knew I wanted to work with my Embossing Folders and I included three different ones on the card I made.


The first section (top left) was a piece of Lap of Luxury DSP that I ran through the Perfect Polka Dots Embossing Folder.  The second section (top right) was Very Vanilla card that I ran through the Lattice Square Embossing Folder.  I used my brayer first to ink the raised cross pattern on the embossing folder in Concord Crush ink.  I love this effect, though I did end up with inky fingers!
The bottom section was Very Vanilla card run through the Elegant Bouquet Embossing Folder and then I used a sponge dauber with Concord Crush ink the highlight the raised image.
I finally finished it all off my stamping the friends image from Cute by the Inch (Level 2 Hostess) in Concord Crush, punching it out with 1 1/4" Square Punch and mounting it on a piece of Pretty in Pink punched with the 1 1/2" Scallop Square.Everything was mounted onto a Pretty in Pink card base, the sentiment was added with Dimensionals.

The Details: 
Card / Paper - Pretty in Pink / Very Vanilla
Stamps / Ink - Cute by the Inch (Level 2 Hostess) / Concord Crush
Embellishments - None
Tools - Lattice Square, Perfect Polka Dot, Elegant Bouquet Embossing Folders / 1 1/4" Square Punch / 1 1/2" Scallop Square Punch / Sponge Dauber / 2-Way Glue / Dimensionals / Trimmer / Stampin Scrub and Mist

Sunday, 26 June 2011

Vintage Vogue Flowers

Hello,

I hope you are all enjoying the fabulous sunshine that has finally emerged!?!?!?
My laptop is set up in the conservatory, so it's really hot in here.  This post will be a quick one!

I just wanted to show you the card I made for the Less is More Challenge this week.
I decided to grab my Vintage Vogue stamp set and try some masking to make the circles in this weeks sketch.
I knew I wanted to use Sahara Sand as the card base, and then looked to my Colour Coach to pick the other colours Bravo Burgundy and Pink Pirouette.  I used Pear Pizzazz as well, for the leafy stamp.


I punched circles of post-it note with 1 3/8" Circle Punch, placed them onto the Sahara Sand card base and then stamped the leaf image over the top.  I removed the masking and then inked up the flower from Vintage Vogue in Pink Pirouette and then did the rock and roll technique to get an outer layer of Bravo Burgundy on the stamp.  I used my Stamp-a-ma-jig to position the flowers correctly inside the circles.

Right, time to get out of the conservatory and get a nice cold drink :o)

The Details: 
Card / Paper - Sahara Sand
Stamps / Ink - Vintage Vogue / Bravo Burgundy / Pink Pirouette / Pear Pizzazz
Embellishments - None
Tools - 1 3/8" Circle Punch / Stamp-a-ma-jig / Trimmer / Stampin Scrub and Mist

Saturday, 25 June 2011

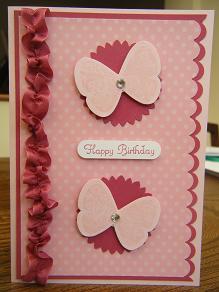
My Birthday Card for Rachel

Finally we are on to the card I made for Rachel from me and my OH.
I went pink, pink,pink with this one and thought she'd love butterflies :o)


The card base is Pink Pirouette and I mounted Rose Red card and Pretty in Pink DSP on top with a Scalloped Border Punched edge.  I double punched Rose Red card with the 1 3/4" Scallop Circle Punch.  The butterflies are from the Butterfly Prints stamp set and are inked in Pink Pirouette also.  The effect is very subtle.  I added some sparkle with a big Basic Rhinestone on each butterfly.
I did this lovely effect with the ribbon by fraying one end and then grabbing a couple of threads and pulling on them.  This gathers the ribbon together so you just have to push the gathering down the ribbon and keep going pulling until you have the length of gathered ribbon you need.  It's stuck down using sticky strip.
The sentiment is actually from the USA Stampin' Up! set called Create a Cupcake.  I really hope we get this in the 2011/2012 catty - I have my fingers crossed :o)

Right, that's it for today.  I'm off to meet Hayley Gillie and discuss the stall I'm helping out with next weekend at the ArtStamp show at Newbury Race Course.  If you live nearby, pop along and see what wonderful Stampin' Up! products and cards are on display and take part in a make and take project as well.
I'm really looking forward to it!

The Details: 
Card / Paper -  Rose Red / Pink Pirouette / Whisper White / Pretty in Pink DSP
Stamps / Ink - Create a Cupcake (USA only) / Butterfly Prints / Rose Red / Pink Pirouette
Embellishments - Basic Rhinestones / 1/2" Rose Red Seam Binding Ribbon
Tools - Scallop Border Punch / Butterfly Punch / 1 3/4" Scallop Circle Punch / Word Window Punch / Sticky Strip / Snail / Dimensionals / Trimmer / Stampin Scrub and Mist

Friday, 24 June 2011

Happy Birthday Rachel - card number two!

So today I'm going to show you the card I made for my brother, his girlfriend and little baby Ethan to give Rachel.  
I kept with the punch art theme!  I'm loving using punches in this way.
A few months back I purchased a punch art tutorial called In The Garden from a very talented lady called Kim Score.  If you love punch art, then check out her blog, she's come up with so many wonderful creations.
So I am going to work through all six of the tutorials I purchased, but I thought I'd start with the Bumble Bee.


Isn't he just the cutest little flower delivery guy you've ever seen?
This is mostly made from the 2-Step Bird Punch along with a few Circle Punches and the Itty Bitty Shapes Flower Punch.
Pretty quick and simple if you know how..........
I mounted the little guy on Melon Mambo card base, with Pumkin Pie backing to the sentiment.  This was stamped in Melon Mambo using the Curly Cute stamp set and the little cupcake is from Itty Bitty Bits.


The Details: 
Card / Paper - Melon Mambo / Pumpkin Pie / Whisper White
Stamps / Ink -Curly Cute / Itty Bitty Bits / Melon Mambo
Embellishments - None
Tools - Scallop Border Punch/ Decorative Label Punch / Circle Punches / 2-Step Bird Punch / Trimmer / Stampin Scrub and Mist / Dimensionals / 2-Way Glue

Thursday, 23 June 2011

Happy Birthday Rachel!

It's my lovely Niece's birthday today.  I'm really hoping she'll love this card as it was a really tough one.
Obviously I had to make her a card from myself and my other half, but then I also got asked to make cards for Rachel by my mum and also my brother.

This card is what I created for my mum to give to her.  My mum asked if I could do something related to horses!!!!  Well, I'm not one to step away from a challenge.  I do however have to own up - I did not come up with this idea, it's something I got from a blog by a lady called Lynn Pratt.


In all fairness, the actual card didn't take long to make, it was just working out what punches to use for all of the elements.  The snout of the horse (it's probably called something completely different!) was meant to be the Wide Oval Punch, but I don't have that and the smaller oval really wasn't right, so I had to improvise.
I used tracing paper and drew round the Wide Oval Punch in the IB&C, then cut it out and used it to draw round onto the River Rock card.  It's not perfect like if it were punched out, but not half bad I didn't think!

Happy Birthday Rachel - enjoy your day :o)

Check back soon as I'll be doing a punch art piggy card for a friends birthday in August!

The Details: 
Card / Paper - Soft Suede / River Rock / Basic Black / Whisper White
Stamps / Ink - Soft Suede
Embellishments - Black Brads
Tools - White Gel Pen / Circle Punches Galore!!!! / 5 Petal Flower Punch / Sponge Daubers Dimensionals / 2-Way Glue